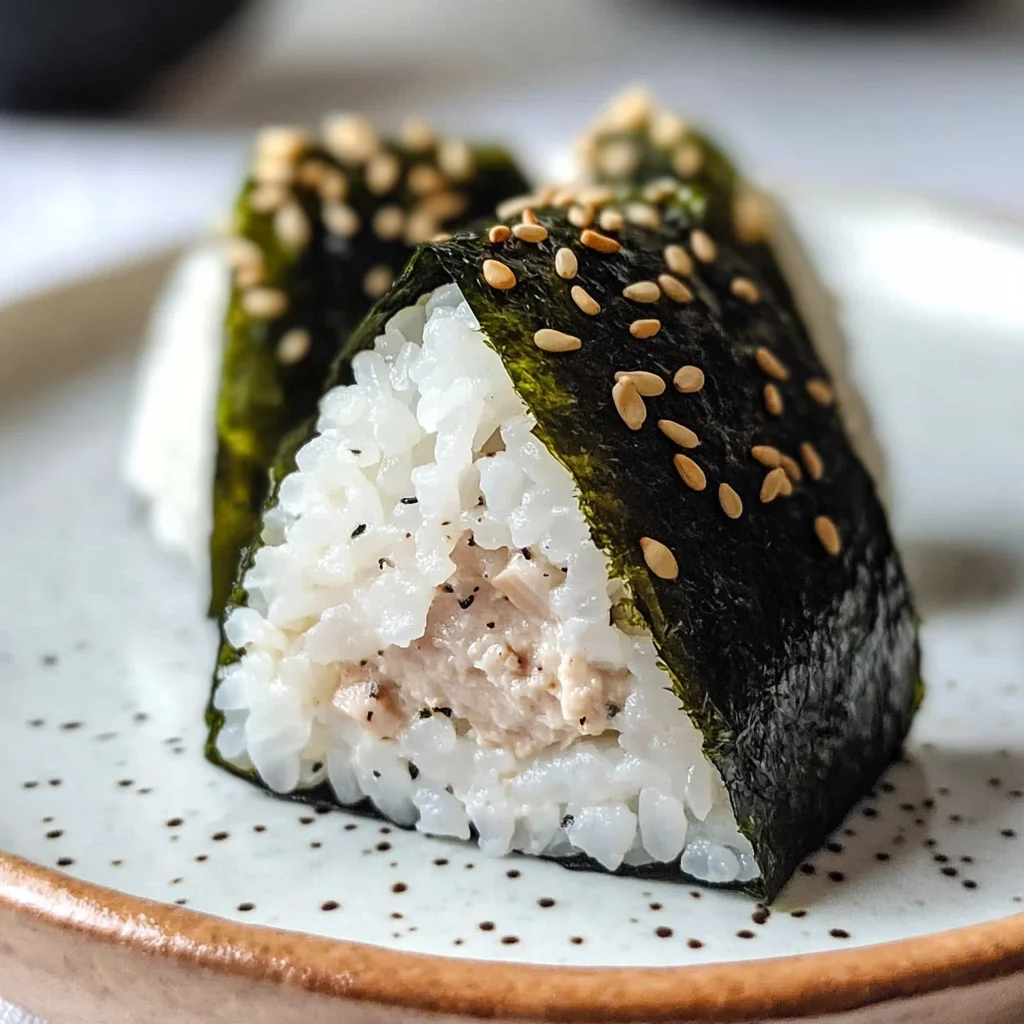
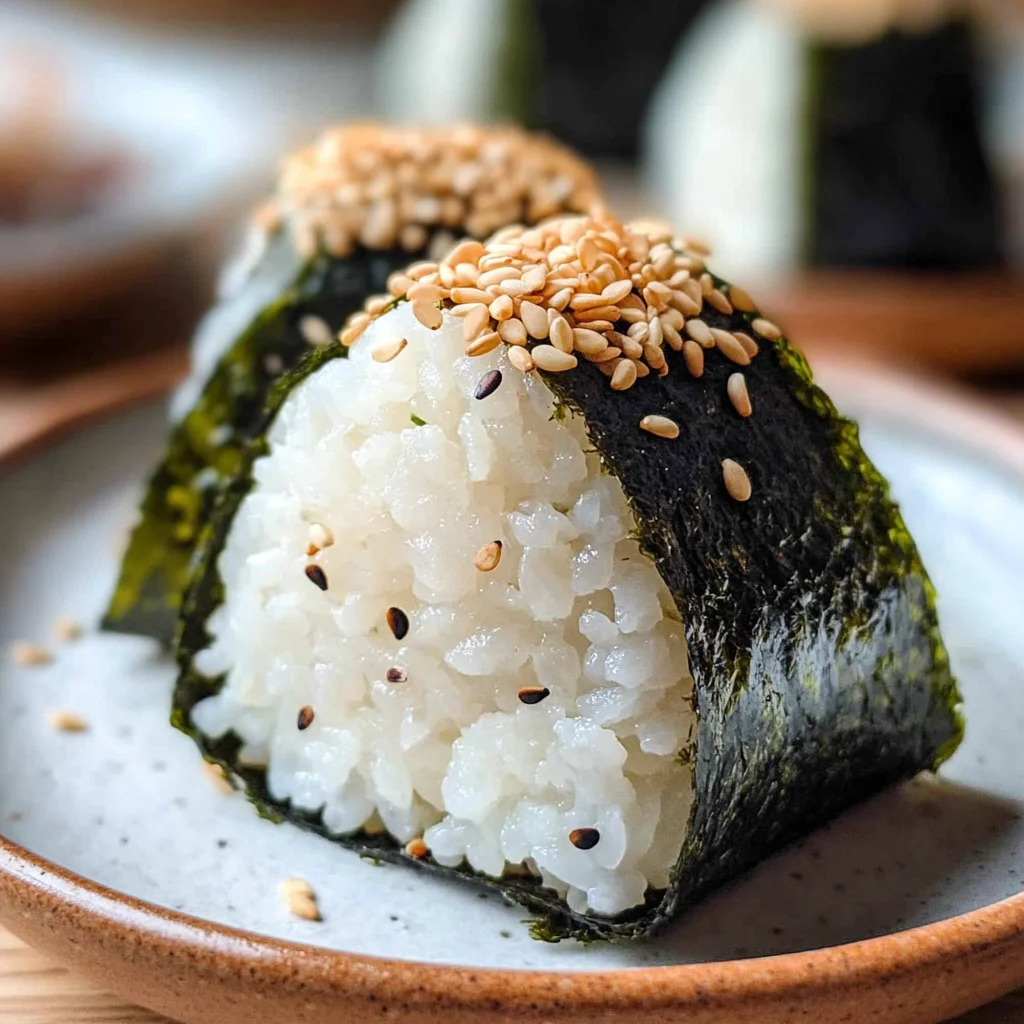
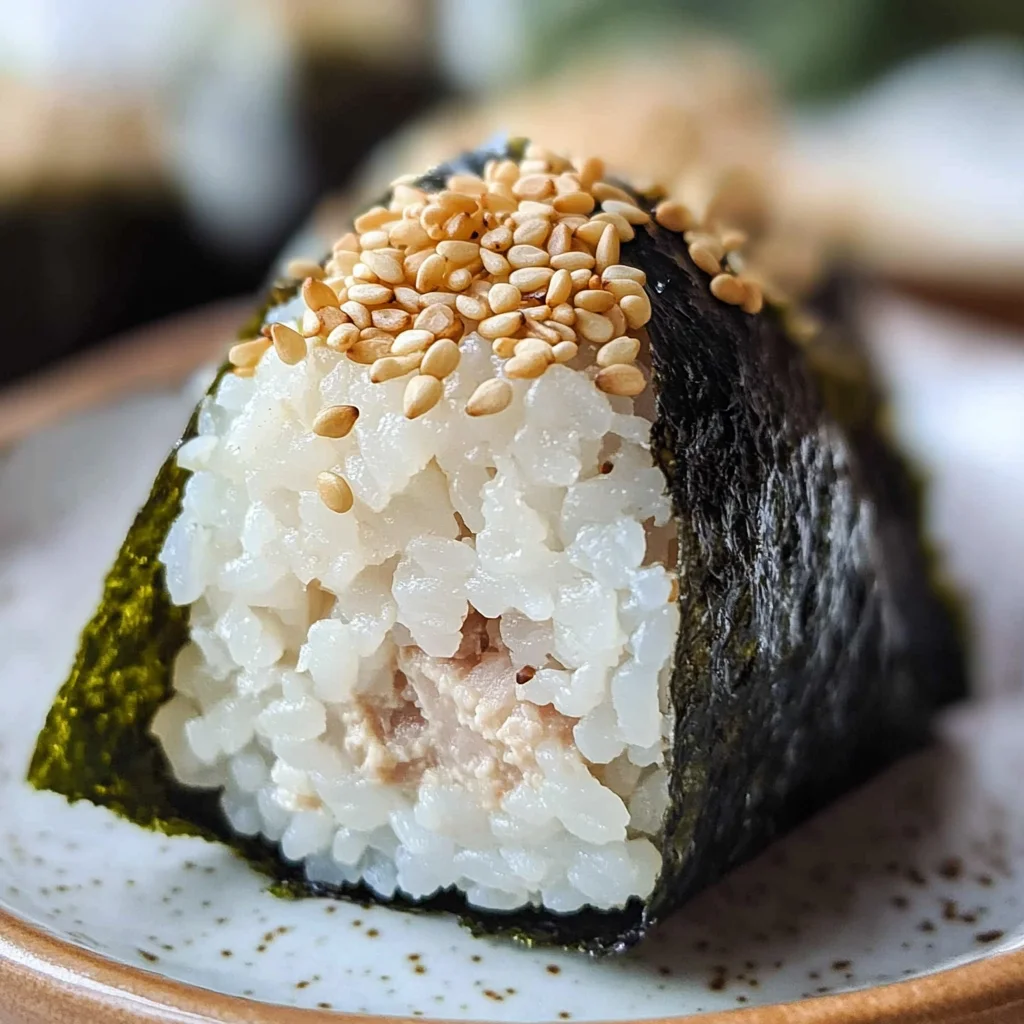
A delicious rice ball stuffed with tuna and mayo, wrapped with dry roasted seaweed, the 15-min. Easy Japanese Tuna Onigiri is a fantastic treat for any time of the day. This quick and simple recipe comes together in just 15 minutes using only six ingredients, making it perfect for breakfast, snacks, lunchboxes, or picnics. Its unique blend of flavors and textures makes it a standout choice for anyone craving something tasty and satisfying.
Jump to:
- Why You’ll Love This Recipe
- Tools and Preparation
- Essential Tools and Equipment
- Importance of Each Tool
- Ingredients
- For the Rice Balls
- For the Filling
- How to Make 15-min. Easy Japanese Tuna Onigiri
- Step 1: Prepare the Rice
- Step 2: Prepare the Tuna Filling
- Step 3: Prepare Nori Sheets
- Step 4: Shape the Rice Balls
- Step 5: Form Triangles
- Step 6: Wrap & Serve
- How to Serve 15-min. Easy Japanese Tuna Onigiri
- As a Quick Breakfast
- In a Lunchbox
- At Picnics
- For Movie Nights
- How to Perfect 15-min. Easy Japanese Tuna Onigiri
- Best Side Dishes for 15-min. Easy Japanese Tuna Onigiri
- Common Mistakes to Avoid
- Storage & Reheating Instructions
- Refrigerator Storage
- Freezing 15-min. Easy Japanese Tuna Onigiri
- Reheating 15-min. Easy Japanese Tuna Onigiri
- Frequently Asked Questions
- Can I use different fillings in my onigiri?
- How do I make my own Japanese mayo?
- Can I prepare onigiri ahead of time?
- What type of rice is best for onigiri?
- How do I eat onigiri?
- Is this recipe suitable for kids?
- Final Thoughts
- 📖 Recipe Card
Why You’ll Love This Recipe
- Quick Preparation: With just 15 minutes from start to finish, you can whip up these tasty rice balls in no time.
- Versatile Serving Options: Enjoy them as a snack, meal, or lunchbox item—perfect for any occasion.
- Simple Ingredients: Made with easy-to-find ingredients, this recipe is accessible for everyone.
- Flavorful Filling: The combination of tuna and mayo creates a creamy filling that pairs wonderfully with rice.
- Fun to Make: Shaping the onigiri is an enjoyable activity that can involve the whole family.
Tools and Preparation
Before you start making your 15-min. Easy Japanese Tuna Onigiri, gather your tools. Having everything ready will make the process smooth.
Essential Tools and Equipment
- Rice paddle
- Fine sieve
- Mixing bowl
- Onigiri mold (optional)
- Plastic wrap (optional)
Importance of Each Tool
- Rice paddle: This tool helps you season and handle the rice without getting too sticky.
- Fine sieve: It ensures you remove excess liquid from the tuna for a better texture in your onigiri.
- Onigiri mold: If you’re looking for perfectly shaped rice balls, this tool is a handy option.
- Plastic wrap: Useful for shaping rice balls without mess when molding by hand.
Ingredients
To prepare your 15-min. Easy Japanese Tuna Onigiri, gather the following ingredients:
For the Rice Balls
- 2 sheets nori (or use 1/2 sheet if you prefer less)
- 1 tsp sesame seeds (for garnishing, optional)
- 2 cups cooked short grain rice (if you’re making fresh rice, see Notes below)
- 1/2 tsp salt
For the Filling
- 5.29 oz canned tuna (in oil recommended, or canned tuna in water)
- 2 tbsp Japanese mayo (or regular mayonnaise)
How to Make 15-min. Easy Japanese Tuna Onigiri
Step 1: Prepare the Rice
- Transfer hot cooked short-grain rice into a large bowl.
- Season with salt using a rice paddle; cover and set aside.
- If using leftover cold rice, cover it and microwave for 2-3 minutes before seasoning.
Step 2: Prepare the Tuna Filling
- Open the can of tuna and strain it using a fine sieve.
- Press down gently with a fork to remove excess liquid; transfer strained tuna to a small bowl.
- Mix in Japanese mayo until well combined; set aside.
Step 3: Prepare Nori Sheets
- Determine how much nori you prefer based on taste.
- If desired, cut two nori sheets in half to create four pieces or use half a sheet cut into four equal strips; set aside.
Step 4: Shape the Rice Balls
- Prepare a bowl of water nearby; dip clean hands into the water to prevent sticking.
- Take 1/2 cup or 100 grams of cooked rice and place it in your palm.
- Shape it into a round ball then flatten it into a 1/2-inch thick pancake.
- Create a dent in the middle and add 2 tbsp or 30 ml of the tuna mayo mixture.
Step 5: Form Triangles
- Fold the rice over the filling while pushing it into the center.
- Firmly pack it into a ball shape; flatten it slightly to create a triangle shape while wetting hands as needed.
Step 6: Wrap & Serve
- Wrap one sheet of nori around each triangle from its base up along its sides.
- Repeat until you’ve formed all four rice balls; garnish each piece with sesame seeds.
- Enjoy immediately!
How to Serve 15-min. Easy Japanese Tuna Onigiri
Serving 15-min. Easy Japanese Tuna Onigiri can be both fun and versatile. These delightful rice balls make for a perfect meal, snack, or picnic food. Here are some creative serving ideas.
As a Quick Breakfast
- Pair with a cup of miso soup for a warm, hearty start to your day.
- Add sliced avocado on the side for extra creaminess and healthy fats.
In a Lunchbox
- Include fresh cut vegetables like cucumber and carrot sticks for a refreshing crunch.
- Pack with fruit slices such as apple or orange segments for sweetness.
At Picnics
- Serve alongside edamame for a protein boost.
- Offer a refreshing salad featuring seaweed and sesame dressing.
For Movie Nights
- Create a platter with various dipping sauces, like soy sauce or spicy mayo.
- Accompany with popcorn sprinkled with sea salt for added texture.
How to Perfect 15-min. Easy Japanese Tuna Onigiri
Perfecting your 15-min. Easy Japanese Tuna Onigiri is all about technique and freshness. Here are some essential tips to enhance your rice ball-making skills.
- Use freshly cooked rice: Freshly made short-grain rice has the right texture and stickiness for shaping perfect onigiri.
- Adjust seasonings: Taste your tuna mayo mix before filling; you can add more mayo or spices according to your preference.
- Keep hands wet: Wetting your hands prevents the rice from sticking, making it easier to shape the onigiri.
- Experiment with fillings: Try different fillings like pickled vegetables or avocado to diversify flavors.
- Store properly: If not eating immediately, wrap each onigiri in plastic wrap to maintain freshness.
Best Side Dishes for 15-min. Easy Japanese Tuna Onigiri
Pairing side dishes with your 15-min. Easy Japanese Tuna Onigiri can elevate your meal experience. Here are some excellent options that complement these tasty rice balls.
- Miso Soup: A classic Japanese soup that’s light and flavorful, perfect for warming up.
- Edamame: Lightly salted steamed edamame is nutritious and adds protein to your meal.
- Seaweed Salad: A refreshing side that brings texture and umami flavor to balance the rice balls.
- Pickled Vegetables: Sweet and tangy pickled veggies enhance the taste of onigiri beautifully.
- Cucumber Salad: Crisp cucumbers dressed in rice vinegar offer a refreshing contrast.
- Fruit Slices: Fresh fruits like strawberries or kiwi provide natural sweetness to round out the meal.
- Japanese Potato Salad: Creamy and slightly sweet, this dish pairs well with the savory tuna filling.
- Tempura Vegetables: Lightly battered and fried vegetables add crunch and flavor alongside the soft onigiri.
Common Mistakes to Avoid
When making 15-min. Easy Japanese Tuna Onigiri, it’s easy to make some common mistakes. Here are a few to watch out for:
- Using cold rice: Cold rice can make it hard to shape the onigiri. Always use warm, cooked short-grain rice for the best texture.
- Not draining the tuna properly: If you don’t drain the tuna enough, it can make your filling too watery. Use a fine sieve and press with a fork to remove excess liquid.
- Skipping seasoning: Forgetting to season your rice with salt can lead to bland rice balls. Always mix in salt while the rice is warm for better flavor absorption.
- Incorrect nori size: Using too much or too little nori can affect enjoyment. Adjust nori sheets based on your preference for wrapping—either half-sheets or full sheets work well.
- Rushing the shaping process: Forming the onigiri too quickly can lead to a loose structure. Take your time when packing and shaping for a firmer ball.
Storage & Reheating Instructions
Refrigerator Storage
- Store in an airtight container for up to 2 days.
- Keep away from moisture to maintain texture.
Freezing 15-min. Easy Japanese Tuna Onigiri
- Wrap each onigiri in plastic wrap and place them in a freezer bag.
- They can be frozen for up to 1 month.
Reheating 15-min. Easy Japanese Tuna Onigiri
- Oven: Preheat oven to 350°F (175°C) and bake for about 10 minutes until warmed through.
- Microwave: Place onigiri on a microwave-safe plate and heat for 30-45 seconds, checking frequently.
- Stovetop: Heat in a non-stick pan over low heat, flipping occasionally until warmed.
Frequently Asked Questions
Here are some common questions about making 15-min. Easy Japanese Tuna Onigiri:
Can I use different fillings in my onigiri?
Absolutely! You can customize your filling with options like avocado, pickled vegetables, or cooked chicken.
How do I make my own Japanese mayo?
You can make homemade mayo using egg yolks, oil, vinegar, and a pinch of salt blended until creamy.
Can I prepare onigiri ahead of time?
Yes! You can prepare them a few hours ahead and store them in the fridge, but they are best enjoyed fresh.
What type of rice is best for onigiri?
Short-grain sushi rice works best as it becomes sticky when cooked, making it easier to shape into balls.
How do I eat onigiri?
Onigiri is great eaten as-is or with soy sauce or dipping sauces. It’s perfect as a snack or part of a meal!
Is this recipe suitable for kids?
Definitely! This recipe is simple and fun for kids to help with shaping and filling their own onigiri.
Final Thoughts
The 15-min. Easy Japanese Tuna Onigiri is not just quick; it’s also versatile and delicious! You can enjoy these tasty rice balls as breakfast, snacks, or lunchbox items. Feel free to customize your fillings based on preference or dietary needs!
Did You Enjoy Making This Recipe? Please rate this recipe with ⭐⭐⭐⭐⭐ or leave a comment.
📖 Recipe Card
Print
15-min. Easy Japanese Tuna Onigiri
- Total Time: 15 minutes
- Yield: Makes approximately four onigiri servings 1x
Description
15-min. Easy Japanese Tuna Onigiri is a delightful and quick treat that’s perfect for any time of day. These rice balls are filled with creamy tuna and mayo, then wrapped in dry roasted seaweed, making them an ideal choice for breakfast, snacks, or lunchboxes.
Ingredients
- 2 sheets nori (or half sheets)
- 2 cups cooked short grain rice
- 5.29 oz canned tuna (in oil or water)
- 2 tbsp Japanese mayo (or regular mayonnaise)
- 1/2 tsp salt
- Optional: 1 tsp sesame seeds for garnishing
Instructions
- Prepare the rice: In a large bowl, combine hot cooked short-grain rice with salt using a rice paddle; set aside.
- Make the tuna filling: Drain the canned tuna using a fine sieve and mix with mayonnaise in a small bowl.
- Shape the rice balls: Wet your hands to prevent sticking; take 1/2 cup of rice, flatten it slightly, add a spoonful of the tuna mixture in the center, then fold rice over the filling and form into triangular shapes.
- Wrap with nori: Use nori sheets to wrap each shaped onigiri securely.
- Serve immediately or store properly for later enjoyment.
- Prep Time: 10 minutes
- Cook Time: 5 minutes
- Category: Snack
- Method: No cooking required, just assembly
- Cuisine: Japanese
Nutrition
- Serving Size: 1 serving
- Calories: 210
- Sugar: 0g
- Sodium: 400mg
- Fat: 10g
- Saturated Fat: 1g
- Unsaturated Fat: 9g
- Trans Fat: 0g
- Carbohydrates: 25g
- Fiber: 1g
- Protein: 12g
- Cholesterol: 20mg