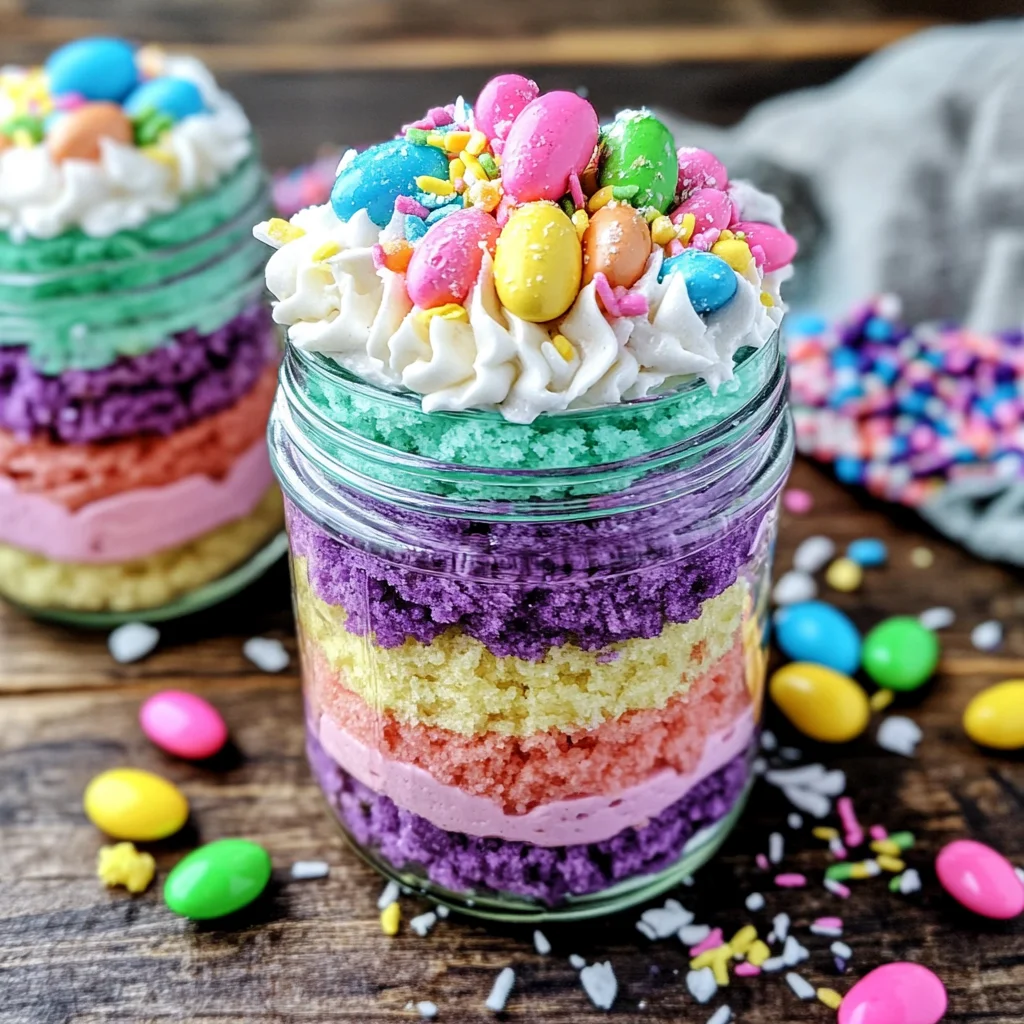
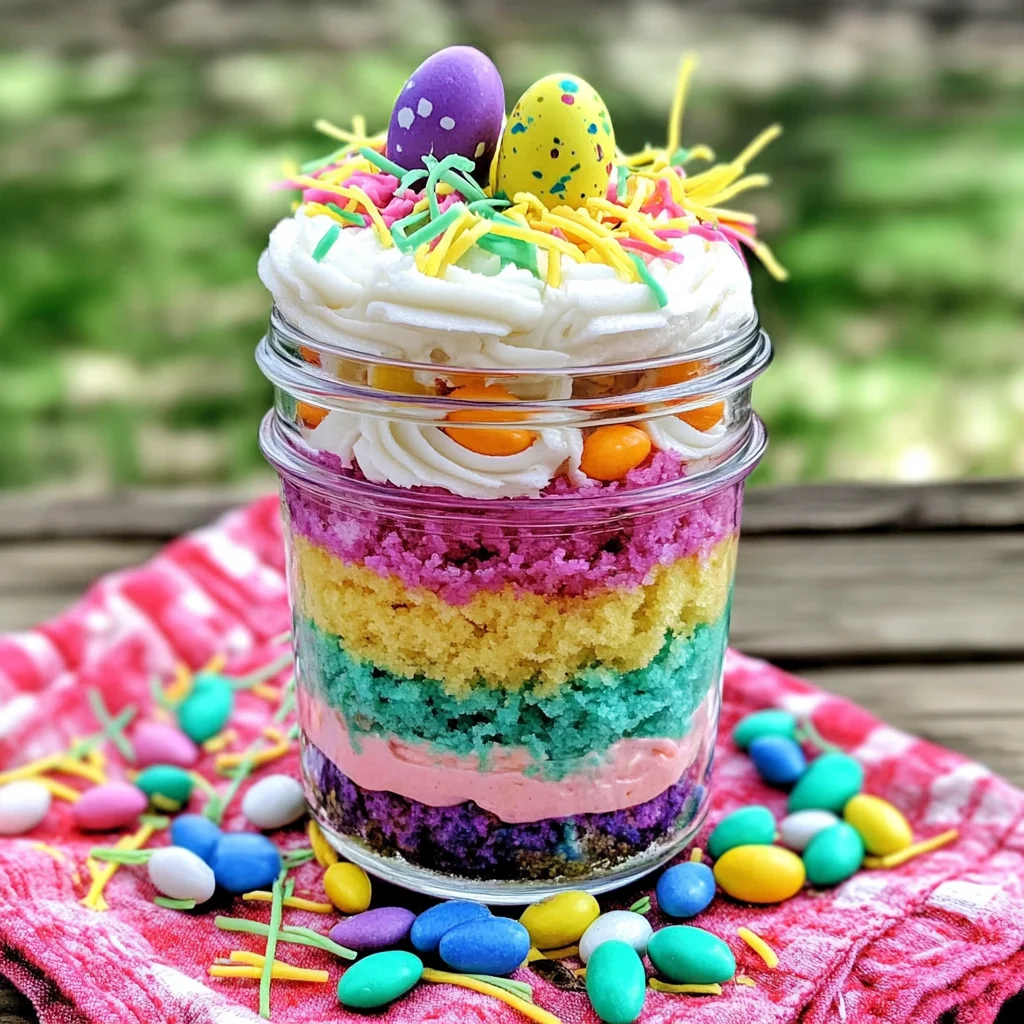
Easter Cake in a Jar is a delightful and vibrant dessert that puts a fun twist on traditional cupcakes. This make-ahead treat is perfect for gatherings, ensuring that everyone can indulge without the fuss of cutting slices. With its colorful layers and charming presentation, it’s an ideal choice for Easter celebrations or any festive occasion. Prepare to impress your guests with this easy yet visually stunning dessert!
Jump to:
- Why You’ll Love This Recipe
- Tools and Preparation
- Essential Tools and Equipment
- Importance of Each Tool
- Ingredients
- For the Cake
- For the Frosting
- For Decoration
- Additional Supplies
- How to Make Easter Cake in a Jar
- Step 1: Prepare the Batter
- Step 2: Bake the Cupcakes
- Step 3: Crumble Cupcakes
- Step 4: Prepare the Frosting
- Step 5: Layer in Jars
- Step 6: Repeat for Remaining Jars
- Step 7: Decorate
- How to Serve Easter Cake in a Jar
- Individual Treats
- Dessert Table Display
- Party Favors
- Themed Serving Plates
- Layered Cake Tasting
- How to Perfect Easter Cake in a Jar
- Best Side Dishes for Easter Cake in a Jar
- Common Mistakes to Avoid
- Storage & Reheating Instructions
- Refrigerator Storage
- Freezing Easter Cake in a Jar
- Reheating Easter Cake in a Jar
- Frequently Asked Questions
- How do I customize my Easter Cake in a Jar?
- Can I use other cake flavors?
- What is the best way to transport my Easter Cake in a Jar?
- Can I make this dessert ahead of time?
- How should I serve my Easter Cake in a Jar?
- Final Thoughts
- 📖 Recipe Card
Why You’ll Love This Recipe
- Visual Appeal: The colorful layers make each jar a feast for the eyes, enhancing any table setting.
- Easy Preparation: With simple steps and minimal equipment, anyone can create this fun dessert.
- Customizable: Feel free to switch up colors and toppings based on personal preferences or seasonal themes.
- Portable: Individual jars make for easy serving and sharing at parties or picnics.
- Kid-Friendly: A great activity to involve kids in the kitchen, making baking a family affair.
Tools and Preparation
Before you dive into creating your Easter Cake in a Jar, gather your tools. Having everything ready will streamline your baking process.
Essential Tools and Equipment
- 4-6 oz. Jars
- Mixing Bowls
- Cupcake Tins
- Plastic Bag (for piping)
- Oven
Importance of Each Tool
- Jars: These serve as both the baking dish and serving vessel, adding charm to your dessert.
- Mixing Bowls: Essential for separating and coloring cake batter, ensuring even mixing.
- Cupcake Tins: Perfectly shaped for baking individual cupcakes that fit perfectly into jars.
Ingredients
For the Cake
- 1 White Cake Mix, make batter per package directions
For the Frosting
- 1 Can White Frosting
For Decoration
- Edible Easter Grass
- Jelly Bean Easter Eggs
- Food Coloring—pink, yellow, teal, purple
Additional Supplies
- 4 Jars—4-6 oz.
- Optional: Easter Sprinkles
How to Make Easter Cake in a Jar
Step 1: Prepare the Batter
- Divide the cake batter into 4 small bowls.
- Color each bowl of batter a different color using food coloring.
Step 2: Bake the Cupcakes
- Scoop the colored batter into cupcake tins.
- Bake according to package directions until done.
Step 3: Crumble Cupcakes
- Allow the cupcakes to cool completely.
- Crumble them into separate bowls while keeping colors distinct.
Step 4: Prepare the Frosting
- Place frosting into a plastic bag.
- Cut off one corner to create a piping bag.
Step 5: Layer in Jars
- Begin with a scoop of purple cake in each jar.
- Pipe a thin layer of frosting over it.
- Add another color of cake followed by another layer of frosting; repeat until all colors are used.
- Ensure the final layer ends with frosting touching the jar’s edge for visibility.
Step 6: Repeat for Remaining Jars
- Follow step 5 for each of the remaining jars.
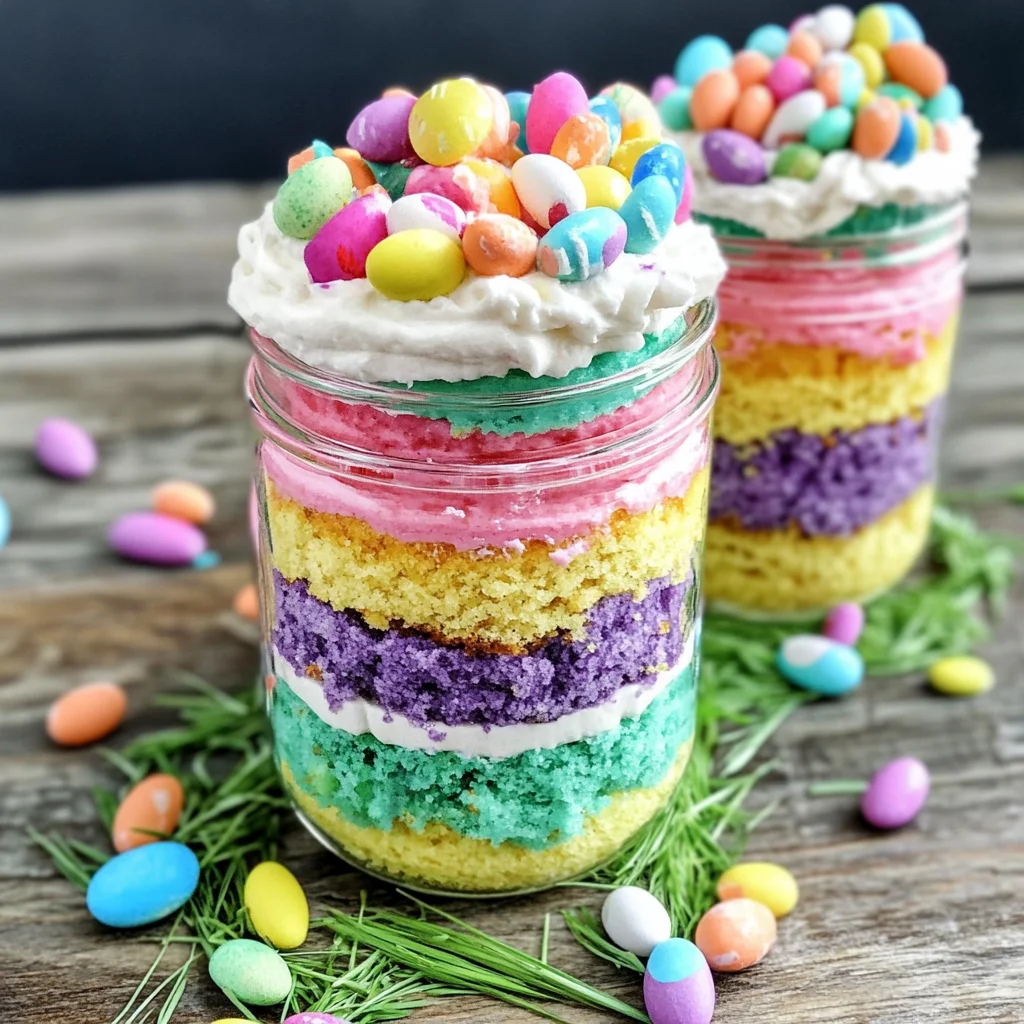
Step 7: Decorate
- Top each jar with edible grass and jellybean eggs to resemble nests.
- Optionally use Easter sprinkles instead for added festivity.
Enjoy your homemade Easter Cake in a Jar! This treat is sure to be loved by all ages at your next celebration!
How to Serve Easter Cake in a Jar
Easter Cake in a Jar is not only visually appealing but also versatile when it comes to serving options. Here are some fun suggestions to make this dessert stand out at your celebration.
Individual Treats
- Serve each jar as an individual dessert for guests. This makes it easy for everyone to grab their own and enjoy without mess!
Dessert Table Display
- Arrange the jars on a colorful tablecloth filled with Easter decorations. This creates an inviting centerpiece that draws attention.
Party Favors
- Send guests home with their own jar of cake as a sweet party favor. Wrap them in cellophane and tie with a ribbon for added charm.
Themed Serving Plates
- Use plates or trays that match the Easter theme, such as pastel colors or floral designs, to enhance the overall presentation of the jars.
Layered Cake Tasting
- Offer mini tasting spoons alongside the jars. Guests can sample each layer before diving into their personal jar, making it an interactive experience.
How to Perfect Easter Cake in a Jar
Creating the perfect Easter Cake in a Jar involves attention to detail and creativity. Here are some tips to elevate your dessert.
- Choose vibrant colors: Use food coloring wisely to create bright and appealing layers that mimic the festive spirit of Easter.
- Pipe frosting neatly: Take your time when piping frosting between layers; this adds elegance and helps maintain distinct layers.
- Use quality ingredients: High-quality cake mix and frosting will enhance flavor and texture, making your dessert taste delightful.
- Chill before serving: Refrigerate the jars for at least 30 minutes before serving. This helps set the layers and keeps them fresh.
- Decorate thoughtfully: Add edible grass or sprinkles on top for an eye-catching finish. This makes your jars look like delightful nests!
- Experiment with flavors: Consider adding different extracts like vanilla or almond for unique flavor profiles within each layer.
Best Side Dishes for Easter Cake in a Jar
Pairing side dishes with your Easter Cake in a Jar can create a well-rounded meal. Here are some delicious options that complement this sweet treat beautifully.
- Fresh Garden Salad
A light salad with mixed greens, cherry tomatoes, and cucumbers provides a refreshing contrast to the sweetness of the cake. - Roasted Vegetables
Seasonal vegetables like carrots, asparagus, and bell peppers roasted with herbs add savory depth to your meal. - Deviled Eggs
Classic deviled eggs are always a hit at gatherings and offer protein alongside your sweet dessert. - Herbed Bread Rolls
Soft bread rolls infused with herbs make for a comforting side that pairs well with any dish on your table. - Fruit Platter
A colorful assortment of seasonal fruits adds freshness and balances out the richness of the cake in a jar. - Cheese Board
A selection of cheeses, crackers, and nuts provides variety and sophistication, making it perfect for entertaining guests. - Vegetable Crudités with Dip
Crisp vegetables served with hummus or ranch dressing offer crunchiness that complements the soft cake layers. - Mini Quiches
These bite-sized delights can be made ahead and feature various fillings that satisfy both savory cravings and pair nicely with sweets.
Common Mistakes to Avoid
Creating the perfect Easter Cake in a Jar can be fun, but there are a few common mistakes to watch out for. Here’s how to avoid them:
- Boldly skip the cooling step: Failing to let your cupcakes cool properly can lead to a messy layering process. Always allow them to cool completely before crumbling.
- Boldly ignore color separation: Mixing all the cake colors together will not provide that vibrant, layered look. Ensure you keep each colored cake separate until layering in the jars.
- Boldly overfill the jars: It might be tempting to pack as much cake as possible into the jars, but overfilling can make for an unappealing dessert. Leave some space at the top for frosting and decorations.
- Boldly neglect frosting technique: Not piping the frosting along the jar sides can result in unclear layers. Always ensure that your frosting touches the edges of the jar for a beautiful display.
- Boldly skip decoration: Leaving your jars undecorated can make them less festive. Take time to add edible grass and jelly beans or sprinkles on top for that Easter touch.
Storage & Reheating Instructions
Refrigerator Storage
- Store your Easter Cake in a Jar in an airtight container.
- It will last up to 4 days in the refrigerator without losing its freshness.
Freezing Easter Cake in a Jar
- You can freeze these jars if you plan ahead.
- Seal tightly with a lid and they can last up to 2 months in the freezer; however, it’s best to freeze before adding decorations.
Reheating Easter Cake in a Jar
- Oven: Preheat your oven to 350°F (175°C). Place jars on a baking sheet and heat for about 10-15 minutes.
- Microwave: Remove lids and microwave on medium power for 20-30 seconds at a time until warmed through.
- Stovetop: If using a pot, place jars inside with water (double boiler method) and heat gently until warm.
Frequently Asked Questions
Here are some common questions about making Easter Cake in a Jar:
How do I customize my Easter Cake in a Jar?
You can change up the colors of food dye or use different types of sprinkles or toppings based on personal preferences or themes!
Can I use other cake flavors?
Absolutely! While this recipe uses white cake mix, feel free to experiment with chocolate, lemon, or any flavor you love.
What is the best way to transport my Easter Cake in a Jar?
To transport safely, keep them upright in a sturdy box or carrier. Adding bubble wrap around them can help prevent spills.
Can I make this dessert ahead of time?
Yes! You can prepare everything ahead of time. Just layer and decorate on the day you plan to serve for maximum freshness.
How should I serve my Easter Cake in a Jar?
These desserts look great served directly from the jar. Provide spoons so guests can dig right into their colorful treat!
Final Thoughts
The Easter Cake in a Jar is not just visually stunning but also incredibly versatile. This delightful dessert is perfect for any gathering and allows for endless customization options. Whether you choose different colors, flavors, or toppings, it’s sure to impress your guests. Give this fun recipe a try and create delightful memories this holiday season!
Did You Enjoy Making This Recipe? Please rate this recipe with ⭐⭐⭐⭐⭐ or leave a comment.
📖 Recipe Card
Print
Easter Cake in a Jar
- Total Time: 40 minutes
- Yield: Serves 4 jars 1x
Description
Easter Cake in a Jar is a whimsical and colorful dessert that transforms traditional cake into an eye-catching treat, perfect for spring celebrations. This layered delight is not only visually appealing but also incredibly easy to prepare, making it a fantastic option for parties or family gatherings. Each jar features vibrant layers of cake and creamy frosting, topped with festive decorations like edible grass and jellybeans. The individual servings add a fun twist to dessert, allowing guests to enjoy their sweet treats without any fuss.
Ingredients
- 1 White Cake Mix
- 1 Can White Frosting
- Food Coloring—pink, yellow, teal, purple
- Edible Easter Grass
- Jelly Bean Easter Eggs
- Optional: Easter Sprinkles
Instructions
- Prepare the batter according to the white cake mix package directions, dividing into four bowls.
- Color each bowl with different food coloring.
- Scoop the colored batter into cupcake tins and bake as directed.
- Once cooled, crumble the cupcakes into separate bowls while keeping colors distinct.
- Place frosting in a plastic bag, cut a corner to create a piping bag.
- Layer the crumbled cake and frosting in jars starting with one color at a time until filled.
- Decorate jars with edible grass and jelly beans or sprinkles.
- Prep Time: 20 minutes
- Cook Time: 20 minutes
- Category: Dessert
- Method: Baking
- Cuisine: American
Nutrition
- Serving Size: 1 jar (200g)
- Calories: 320
- Sugar: 40g
- Sodium: 210mg
- Fat: 12g
- Saturated Fat: 5g
- Unsaturated Fat: 6g
- Trans Fat: 0g
- Carbohydrates: 51g
- Fiber: 1g
- Protein: 3g
- Cholesterol: 15mg