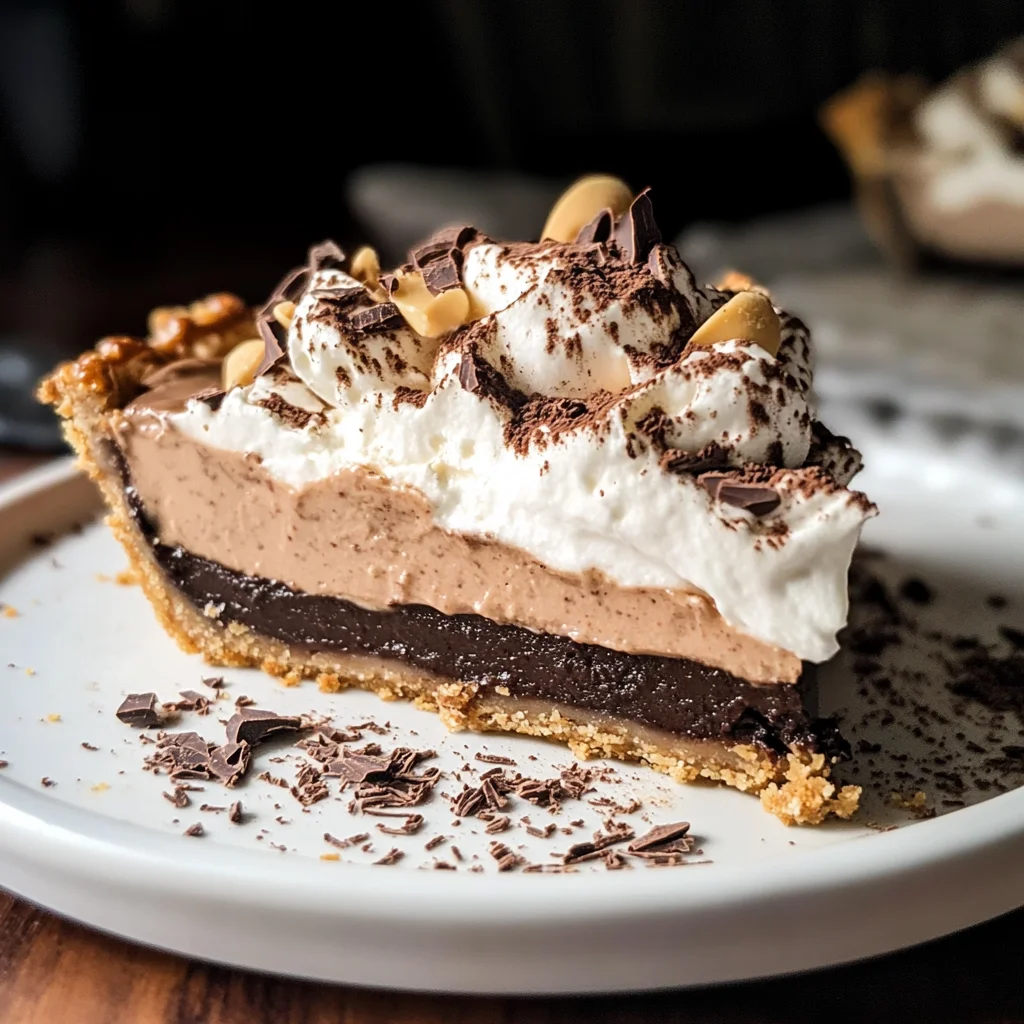
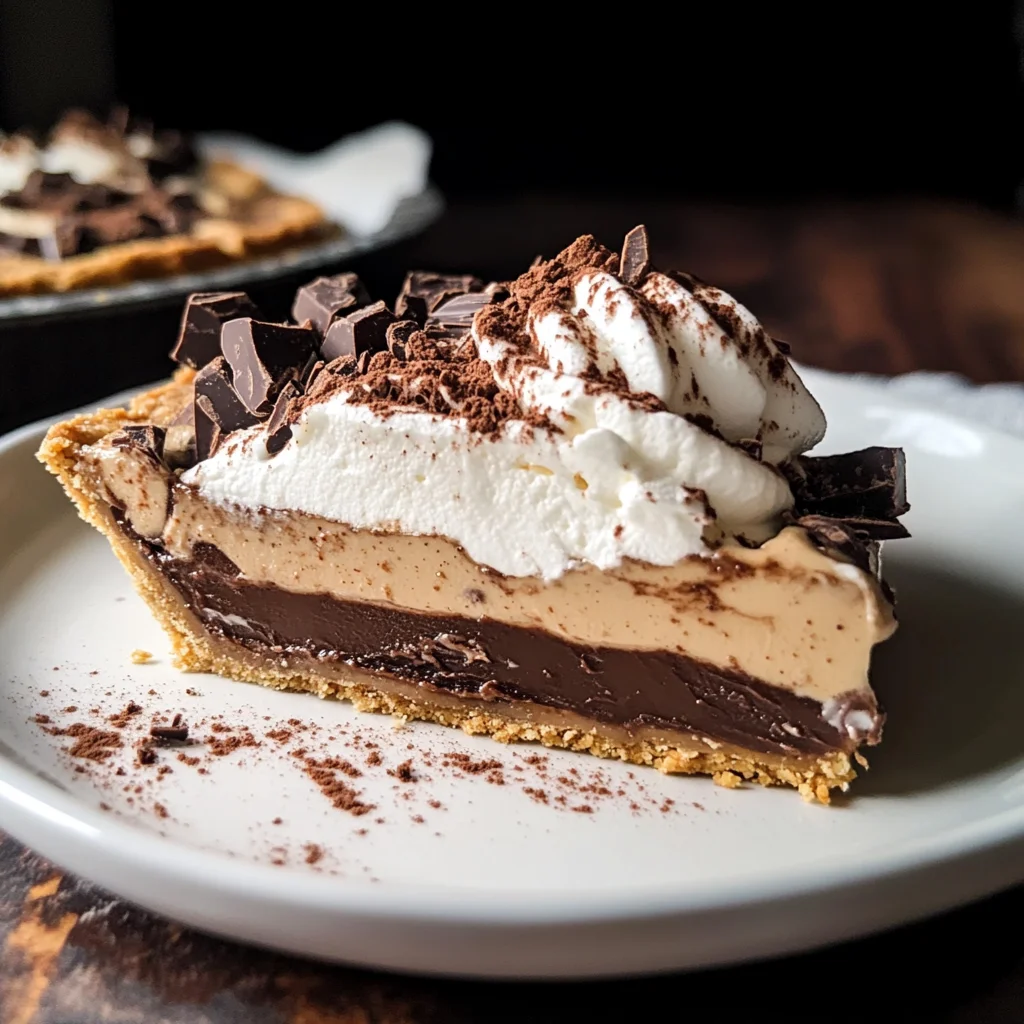
Every bite of Vintage Chocolate Peanut Butter Pie is a delightful combination of sweet, salty, and creamy flavors. This pie is perfect for any occasion, whether it’s a family gathering, a holiday celebration, or just a cozy night in. The rich chocolate and creamy peanut butter filling make it an unforgettable dessert that everyone will love.
Jump to:
- Why You’ll Love This Recipe
- Tools and Preparation
- Essential Tools and Equipment
- Importance of Each Tool
- Ingredients
- For the Crust
- For the Filling
- For Topping
- How to Make Vintage Chocolate Peanut Butter Pie
- Step 1: Preheat the Oven
- Step 2: Make the Crust
- Step 3: Prepare the Chocolate Layer
- Step 4: Mix the Filling
- Step 5: Prepare Topping
- How to Serve Vintage Chocolate Peanut Butter Pie
- A La Mode
- Coffee Pairing
- Fresh Berries
- Nut Topping
- How to Perfect Vintage Chocolate Peanut Butter Pie
- Best Side Dishes for Vintage Chocolate Peanut Butter Pie
- Common Mistakes to Avoid
- Storage & Reheating Instructions
- Refrigerator Storage
- Freezing Vintage Chocolate Peanut Butter Pie
- Reheating Vintage Chocolate Peanut Butter Pie
- Frequently Asked Questions
- Can I make Vintage Chocolate Peanut Butter Pie ahead of time?
- What can I use instead of heavy cream?
- How do I customize my Vintage Chocolate Peanut Butter Pie?
- Is it possible to make this pie gluten-free?
- Final Thoughts
- 📖 Recipe Card
Why You’ll Love This Recipe
- Decadent Flavor: Indulge in the rich taste of chocolate and peanut butter that satisfies every sweet tooth.
- Easy to Make: With simple steps and accessible ingredients, this pie comes together quickly, making it ideal for beginners.
- Versatile Dessert: Perfect for birthdays, holidays, or just because—this pie fits any occasion.
- Make Ahead Option: Prepare it in advance and store it in the fridge, so you can enjoy your time with guests without any last-minute stress.
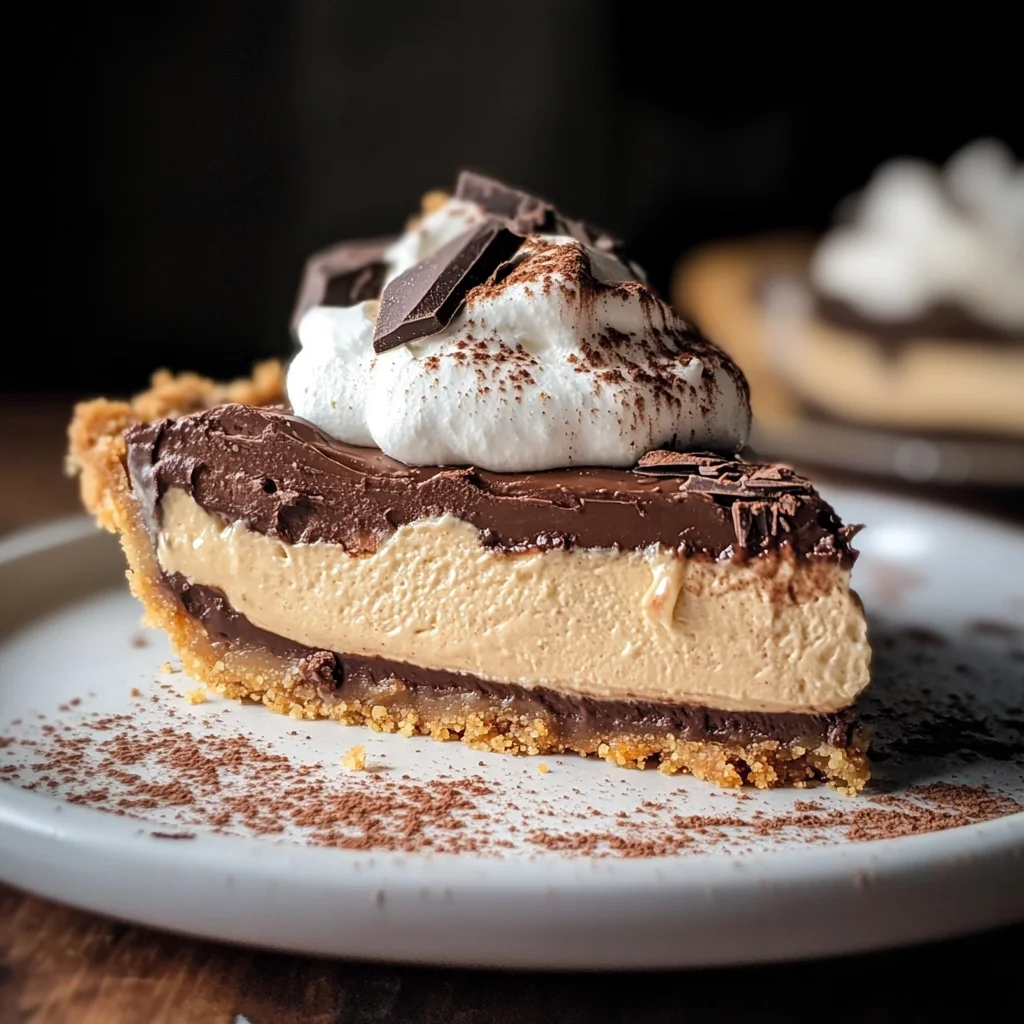
- Impressive Presentation: The layered look and dusting of cocoa powder make this pie visually stunning for your dessert table.
Tools and Preparation
To create the perfect Vintage Chocolate Peanut Butter Pie, you’ll need some essential kitchen tools. These items will help ensure your pie comes out just right.
Essential Tools and Equipment
- Food processor
- Mixing bowls
- Electric mixer
- Measuring cups and spoons
- Tart pan or pie plate
Importance of Each Tool
- Food processor: This tool simplifies the process of crushing pretzels into fine crumbs for the crust.
- Electric mixer: Crucial for achieving the smooth and fluffy texture needed in the filling.
- Tart pan or pie plate: Ensures even baking and easy removal of your delicious pie.
Ingredients
Every bite is sweet, salty, creamy, and heavy on the chocolate and the peanut butter. Great year-round!
For the Crust
- 2 cups mini salted pretzels
- 6 tablespoons salted butter, melted
- 1 tablespoon brown sugar
For the Filling
- 6 ounces semi-sweet or dark chocolate, chopped
- 2 teaspoons coconut oil
- 4 ounces cream cheese, at room temperature
- 3/4 – 1 1/4 cups powdered sugar
- 1 1/2 cups creamy peanut butter
- 1 tablespoon, plus 1 teaspoon vanilla extract
For Topping
- 2 cups, plus 1 tablespoon heavy cream
- cocoa powder, for dusting (optional)
How to Make Vintage Chocolate Peanut Butter Pie
Step 1: Preheat the Oven
Preheat your oven to 350° F. Grease an 8 or 9-inch tart pan with a removable bottom or use a standard pie plate for easier serving.
Step 2: Make the Crust
In a food processor:
1. Pulse together the mini salted pretzels, butter, and brown sugar until you achieve fine crumbs.
2. Press this mixture into your prepared pie plate firmly.
3. Bake for about 8 minutes until golden brown.
Step 3: Prepare the Chocolate Layer
While the crust bakes:
1. In a microwave-safe bowl, combine the chocolate, 1 tablespoon of cream, and coconut oil.
2. Microwave on medium heat, stirring every 45 seconds until melted.
3. Carefully spread this melted chocolate onto the bottom of your baked crust and gently up the sides.
4. Chill in the freezer for about 10-15 minutes.
Step 4: Mix the Filling
In a medium-sized mixing bowl:
1. Beat together the cream cheese and powdered sugar on high speed until very smooth (about 2 minutes).
2. Add in peanut butter, mixing until well combined.
3. Gradually mix in up to 1 1/4 cups of heavy cream (adding it slowly helps incorporate air).
4. Finally, add in the vanilla extract and whip on high speed until light and fluffy (about 1-2 minutes).
5. Spoon this mixture into your chilled crust evenly.
Step 5: Prepare Topping
Using an electric mixer:
1. Whip together 3/4 cup heavy cream with 1-2 tablespoons powdered sugar and 1 teaspoon vanilla until soft peaks form.
2. Dollop this whipped cream generously onto your filled pie.
3. Dust with cocoa powder just before serving for added flair.
The Vintage Chocolate Peanut Butter Pie keeps well in the fridge for up to four days—if it lasts that long! Enjoy each slice!
How to Serve Vintage Chocolate Peanut Butter Pie
Serving Vintage Chocolate Peanut Butter Pie can elevate any gathering, making it a delightful centerpiece. This pie pairs wonderfully with various accompaniments that enhance its rich flavors.
A La Mode
- Serve with vanilla ice cream: The creamy texture of vanilla ice cream complements the pie’s richness perfectly.
- Try caramel or chocolate sauce drizzled on top: This adds an extra layer of sweetness and a beautiful presentation.
Coffee Pairing
- Brew a strong cup of coffee: The bitterness of coffee balances the sweet and salty flavors of the pie.
- Consider a mocha latte: This chocolate-infused coffee option enhances the dessert’s chocolate notes.
Fresh Berries
- Accompany with fresh raspberries or strawberries: Their tartness contrasts beautifully with the pie’s sweetness.
- Whipped cream and berry garnish: Add a dollop of whipped cream topped with berries for color and flavor.
Nut Topping
- Crushed nuts, like peanuts or almonds: Sprinkle atop for added crunch and nutty flavor that matches the peanut butter.
How to Perfect Vintage Chocolate Peanut Butter Pie
Perfecting your Vintage Chocolate Peanut Butter Pie involves attention to detail in every step. Follow these tips to ensure you achieve the best results.
- Chill your crust: Allowing your crust to cool completely ensures it holds up against the filling without becoming soggy.
- Use room temperature ingredients: Cream cheese and heavy cream whip better when at room temperature, leading to a smoother filling.
- Don’t overmix: When combining peanut butter and cream, mix just until smooth; overmixing can lead to a dense texture.
- Taste as you go: Adjust the sweetness by sampling the filling before chilling; add more powdered sugar if desired.
- Let it set: Allowing the pie to chill for at least one hour helps it maintain its shape when sliced.
Best Side Dishes for Vintage Chocolate Peanut Butter Pie
Pairing side dishes with your Vintage Chocolate Peanut Butter Pie can create a well-rounded meal experience. Here are some great options:
- Fresh Fruit Salad: A mix of seasonal fruits offers a refreshing contrast to the rich pie.
- Classic Garden Salad: Light greens tossed with vinaigrette help balance out the heaviness of dessert.
- Roasted Vegetables: Seasonal roasted veggies add a savory element that pairs well with sweet desserts.
- Cheese Platter: A selection of mild cheeses can complement the flavors in the pie without overpowering them.
- Chocolate Chip Cookies: For those who can’t get enough chocolate, cookies make for a delightful addition.
- Mini Cupcakes: Offer an assortment of mini cupcakes for variety while keeping portions small and manageable.
Common Mistakes to Avoid
When making Vintage Chocolate Peanut Butter Pie, there are a few common pitfalls to steer clear of that can affect the taste and texture.
- Over-mixing the filling: This can lead to a dense texture. Mix just until ingredients are combined for a lighter pie.
- Not chilling the crust properly: Skipping this step may result in a soggy bottom. Make sure to chill after applying chocolate.
- Using cold cream cheese: Cold cream cheese will not blend well. Always use room temperature cream cheese for a smooth filling.
- Ignoring the chocolate melting method: Microwaving chocolate too long can burn it. Melt in short intervals, stirring frequently to avoid overheating.
- Skipping the cocoa dusting: This adds an elegant finish and extra flavor. Don’t forget to dust with cocoa before serving for visual appeal.
Storage & Reheating Instructions
Refrigerator Storage
- Store leftover pie in an airtight container.
- It will keep well in the fridge for up to 4 days.
Freezing Vintage Chocolate Peanut Butter Pie
- Wrap the pie tightly in plastic wrap or aluminum foil.
- It can be frozen for up to 2 months. Thaw it overnight in the refrigerator before serving.
Reheating Vintage Chocolate Peanut Butter Pie
- Oven: Preheat to 350°F, cover with foil, and warm for about 10-15 minutes.
- Microwave: Heat individual slices on medium power for about 30 seconds until slightly warm.
- Stovetop: Place a slice in a non-stick pan over low heat, cover, and warm gently for about 5 minutes.
Frequently Asked Questions
Here are some frequently asked questions about Vintage Chocolate Peanut Butter Pie that might help you perfect your recipe.
Can I make Vintage Chocolate Peanut Butter Pie ahead of time?
Yes! You can prepare it a day in advance. Just store it covered in the refrigerator until you are ready to serve.
What can I use instead of heavy cream?
You can substitute heavy cream with coconut cream for a dairy-free option or use whipped topping as an alternative.
How do I customize my Vintage Chocolate Peanut Butter Pie?
Feel free to add toppings like crushed nuts or drizzles of chocolate sauce. You can also mix different types of nut butters into the filling.
Is it possible to make this pie gluten-free?
Absolutely! Use gluten-free pretzels for the crust, and you’ll have a delicious gluten-free dessert.
Final Thoughts
Vintage Chocolate Peanut Butter Pie is truly a delightful treat that combines rich chocolate and creamy peanut butter flavors. Its versatility allows for numerous customization options, making it suitable for any occasion. Try making this recipe today, and enjoy every sweet bite!
Did You Enjoy Making This Recipe? Please rate this recipe with ⭐⭐⭐⭐⭐ or leave a comment.
📖 Recipe Card
Print
Vintage Chocolate Peanut Butter Pie
- Total Time: 28 minutes
- Yield: Serves approximately 12 slices 1x
Description
Indulge in the rich and creamy delight of Vintage Chocolate Peanut Butter Pie, a dessert that beautifully balances sweet, salty, and smooth flavors. This no-bake treat features a crunchy pretzel crust layered with luscious chocolate and peanut butter filling, all topped with dreamy whipped cream. It’s perfect for any gathering—be it a holiday celebration, a birthday bash, or just a cozy night in. With its impressive appearance and decadent taste, this pie is sure to impress family and friends alike. Plus, it’s simple to make, allowing even beginner bakers to create an unforgettable dessert experience.
Ingredients
- 2 cups mini salted pretzels
- 6 tablespoons salted butter, melted
- 1 tablespoon brown sugar
- 6 ounces semi-sweet or dark chocolate, chopped
- 2 teaspoons coconut oil
- 4 ounces cream cheese, at room temperature
- 3/4 – 1 1/4 cups powdered sugar
- 1 1/2 cups creamy peanut butter
- 2 cups, plus 1 tablespoon heavy cream
- cocoa powder, for dusting (optional)
Instructions
- Preheat your oven to 350°F and prepare an 8 or 9-inch tart pan.
- In a food processor, pulse pretzels with melted butter and brown sugar until fine crumbs form. Press firmly into the pan and bake for about 8 minutes until golden.
- Melt chocolate with coconut oil in the microwave, stirring every 45 seconds until smooth. Spread onto the baked crust and chill in the freezer for 10-15 minutes.
- Beat cream cheese with powdered sugar until smooth. Mix in peanut butter and gradually add heavy cream until fluffy. Spoon into the chilled crust.
- Whip remaining heavy cream with powdered sugar until soft peaks form and dollop on top of the pie. Dust with cocoa powder before serving.
- Prep Time: 20 minutes
- Cook Time: 8 minutes
- Category: Dessert
- Method: Baking
- Cuisine: American
Nutrition
- Serving Size: 1 slice (approximately 100g)
- Calories: 400
- Sugar: 22g
- Sodium: 320mg
- Fat: 30g
- Saturated Fat: 15g
- Unsaturated Fat: 13g
- Trans Fat: 0g
- Carbohydrates: 30g
- Fiber: 2g
- Protein: 6g
- Cholesterol: 35mg