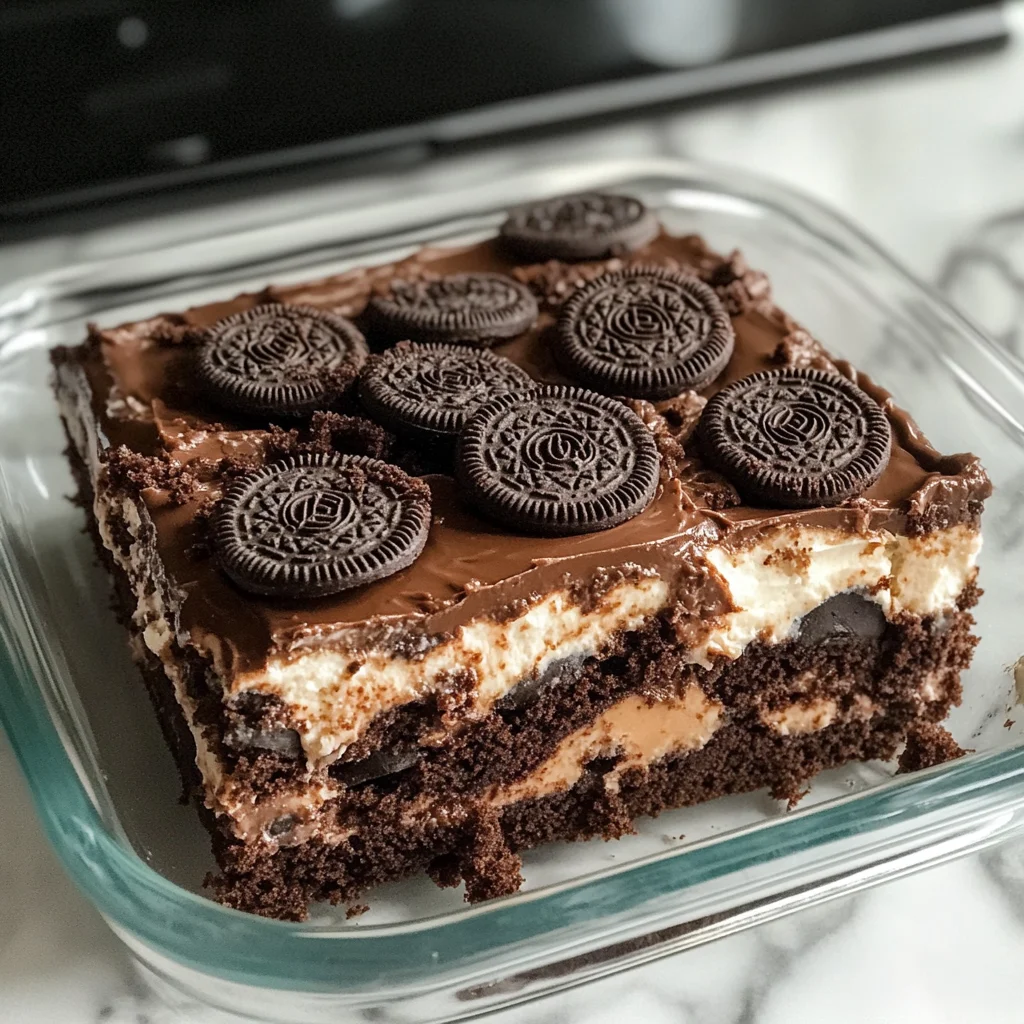
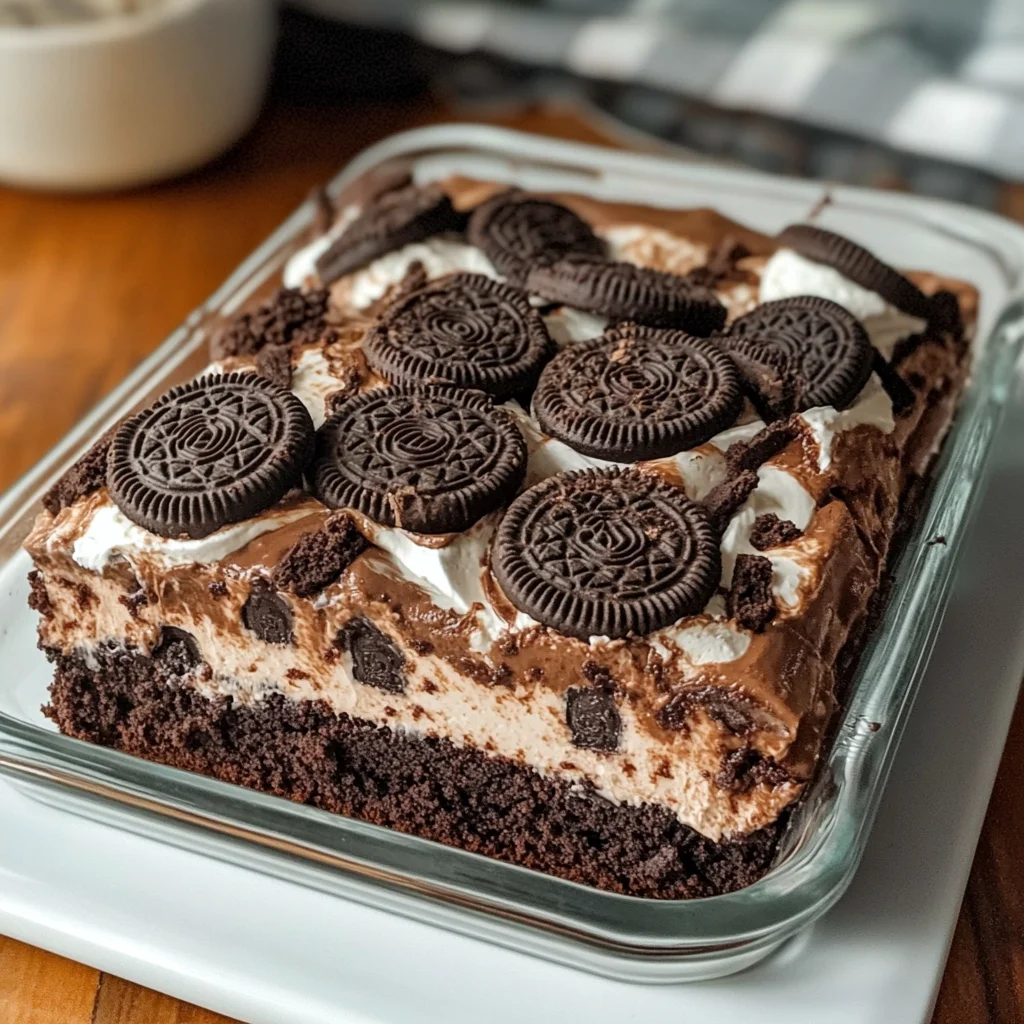
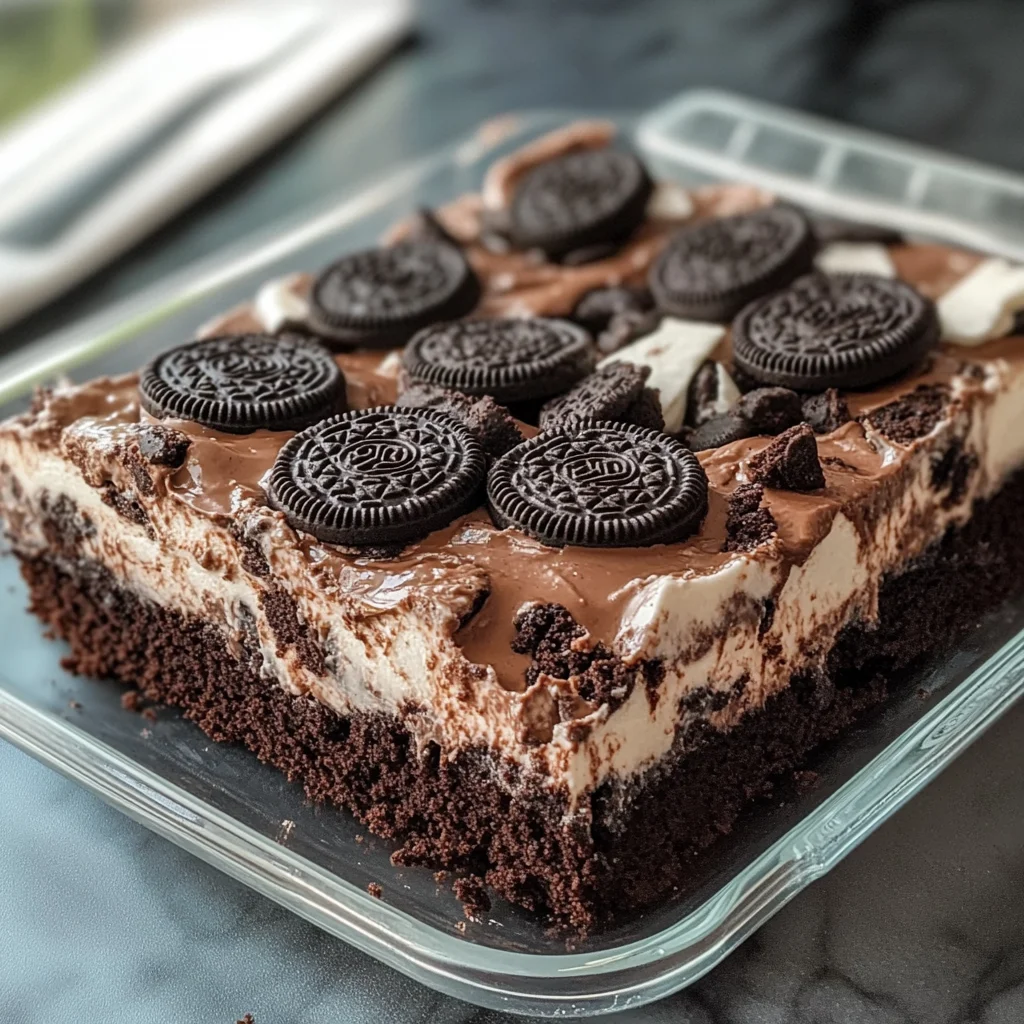
This Oreo Dump Cake is the ultimate dessert for any occasion. With its rich layers of chocolatey goodness, creamy Cool Whip, and crunchy Oreos, it’s sure to impress guests at potlucks, casual gatherings, or even a cozy night in. The simplicity of this recipe makes it easy to whip up, giving you more time to enjoy with friends and family while indulging in a delicious treat.
Jump to:
- Why You’ll Love This Recipe
- Tools and Preparation
- Essential Tools and Equipment
- Importance of Each Tool
- Ingredients
- For the Cake Base
- For the Topping
- How to Make Oreo Dump Cake
- Step 1: Preheat the Oven
- Step 2: Layer the Oreos
- Step 3: Add Condensed Milk and Cool Whip
- Step 4: Add Remaining Ingredients
- Step 5: Top with Butter
- Step 6: Bake
- How to Serve Oreo Dump Cake
- Individual Portions
- With Ice Cream
- Drizzled with Chocolate Sauce
- Garnished with Whipped Cream
- Fresh Fruit Addition
- How to Perfect Oreo Dump Cake
- Best Side Dishes for Oreo Dump Cake
- Common Mistakes to Avoid
- Storage & Reheating Instructions
- Refrigerator Storage
- Freezing Oreo Dump Cake
- Reheating Oreo Dump Cake
- Frequently Asked Questions
- What is Oreo Dump Cake?
- Can I use other flavors of cookies?
- How do I make this dessert gluten-free?
- Can I add other toppings?
- Final Thoughts
- 📖 Recipe Card
Why You’ll Love This Recipe
- Quick and Easy: This dump cake requires minimal prep time—just 10 minutes!
- Decadent Flavor: Experience a delightful blend of chocolate and cookies in every bite.
- Versatile Dessert: Perfect for parties, holidays, or whenever you crave something sweet.
- Crowd-Pleasing: Its gooey texture and rich taste make it a favorite among all ages.
- Five Simple Ingredients: You only need five pantry staples to create this indulgent dessert.
Tools and Preparation
Before diving into the recipe, gather your essential tools to ensure everything runs smoothly. Having the right equipment will help you create the perfect Oreo Dump Cake without any hassle.
Essential Tools and Equipment
- 9×13-inch baking dish
- Mixing spatula
- Fork
- Measuring cups
- Oven mitts
Importance of Each Tool
- Baking Dish: A sturdy pan ensures even baking and helps achieve the desired gooeyness.
- Mixing Spatula: Ideal for spreading layers uniformly without mixing ingredients too much.
- Fork: Useful for breaking up lumps in the cake mix for an even bake.
Ingredients
This easy, crowd-pleasing Oreo Dump Cake layers chocolatey goodness with cookies, Cool Whip, and cake mix—all baked into a gooey, rich dessert with minimal prep. Perfect for potlucks, casual get-togethers, or anytime you need a quick chocolate fix.
For the Cake Base
- 20 Oreo cookies
- 14 oz sweetened condensed milk (1 can)
- 1 (8 oz) container Cool Whip, thawed
For the Topping
- 1 box chocolate cake mix
- ¾ cup unsalted butter (1½ sticks or 12 tablespoons), cut into small pats
How to Make Oreo Dump Cake
Step 1: Preheat the Oven
Set your oven to 350°F (175°C). Lightly grease a 9×13-inch baking dish with butter or non-stick spray.
Step 2: Layer the Oreos
Arrange 10 Oreo cookies in a single layer across the bottom of the dish.
Step 3: Add Condensed Milk and Cool Whip
Evenly pour the sweetened condensed milk over the Oreos. Gently spread the Cool Whip over the milk using a spatula.
Step 4: Add Remaining Ingredients
Sprinkle the entire box of chocolate cake mix evenly over the Cool Whip layer. Use a fork to break up any lumps in the cake mix for even baking.
Step 5: Top with Butter
Distribute the pats of butter evenly over the surface of the cake mix. Do not stir or mix.
Step 6: Bake
Bake for 40–45 minutes or until the top is bubbly and slightly crisp. Allow to cool for a few minutes before serving warm.
How to Serve Oreo Dump Cake
Oreo Dump Cake is a versatile dessert that can be enjoyed in various ways. Whether you’re hosting a party or just indulging at home, these serving suggestions will elevate your dessert experience.
Individual Portions
- Serve in small cups for easy portioning and a fun presentation.
- Top each cup with extra crushed Oreos for added crunch.
With Ice Cream
- Pair warm Oreo Dump Cake with a scoop of vanilla or chocolate ice cream.
- The cold ice cream melts slightly, creating a delicious contrast with the warm cake.
Drizzled with Chocolate Sauce
- Drizzle melted chocolate sauce over each serving for an extra indulgent touch.
- This adds richness and enhances the chocolate flavor.
Garnished with Whipped Cream
- Add a dollop of whipped cream on top for a light and airy finish.
- Consider adding sprinkles or crushed Oreos as a fun garnish.
Fresh Fruit Addition
- Serve alongside fresh berries or sliced bananas to balance the sweetness.
- The fruit adds color and freshness to every bite.
How to Perfect Oreo Dump Cake
To ensure your Oreo Dump Cake turns out perfectly every time, consider these helpful tips:
- Use fresh ingredients: Make sure your Cool Whip and condensed milk are fresh for the best taste.
- Crush Oreos properly: If you choose to crush some Oreos for topping, make sure they are not too fine; larger pieces add nice texture.
- Monitor baking time: Every oven is different. Check your cake at the 40-minute mark to avoid overbaking.
- Let it cool slightly: Allowing the cake to cool for about 10 minutes before serving helps set the layers.
- Store leftovers correctly: Keep any leftovers in an airtight container in the fridge for up to three days.
Best Side Dishes for Oreo Dump Cake
Oreo Dump Cake pairs well with several side dishes that complement its rich flavors. Here are some great options:
- Fresh Fruit Salad
A mix of seasonal fruits adds brightness and balances the sweetness of the cake. - Chocolate Pudding
Serve alongside rich chocolate pudding for an extra chocolatey treat that everyone will love. - Vanilla Yogurt Parfait
Layer yogurt with granola and fruit for a creamy, crunchy side that contrasts nicely with the dump cake. - Peanut Butter Cookies
These cookies add a delightful crunch and nutty flavor that pairs well with chocolate desserts. - Cheesecake Bites
Small cheesecake squares provide a rich counterpart to the lighter texture of Cool Whip in the dump cake. - Nut Mix
A savory nut mix can offer a satisfying crunch and salty contrast to sweet desserts like Oreo Dump Cake.
Common Mistakes to Avoid
When making Oreo Dump Cake, it’s easy to make some common mistakes that can affect the final result. Here are a few to watch out for:
- Skipping the greasing step: Not greasing your baking dish properly can cause the cake to stick. Always grease it with butter or non-stick spray before adding ingredients.
- Overmixing the cake mix: Mixing the cake mix too much can lead to a dense texture. Just sprinkle it evenly over the Cool Whip without stirring.
- Using cold ingredients: Cold ingredients may not blend properly, leading to uneven baking. Ensure your Cool Whip is fully thawed and other ingredients are at room temperature.
- Not letting it cool: Cutting into the cake immediately after baking can result in a messy serving. Allow it to cool for at least a few minutes before digging in.
- Neglecting portion size: Serving oversized pieces may overwhelm your guests. Cut smaller portions, especially since this dessert is rich!
Storage & Reheating Instructions
Refrigerator Storage
- Store leftover Oreo Dump Cake in an airtight container.
- It will last in the refrigerator for about 3-5 days.
Freezing Oreo Dump Cake
- For long-term storage, freeze portions in freezer-safe containers.
- It can be frozen for up to 2 months.
Reheating Oreo Dump Cake
- Oven: Preheat to 350°F (175°C) and heat for about 15-20 minutes until warm.
- Microwave: Heat individual slices on high for about 30 seconds or until warmed through.
- Stovetop: Place a slice in a non-stick skillet over low heat, covering it until warmed through, which helps keep it moist.
Frequently Asked Questions
What is Oreo Dump Cake?
Oreo Dump Cake is a simple dessert made by layering crushed Oreo cookies, sweetened condensed milk, Cool Whip, and chocolate cake mix. It’s baked until gooey and delicious.
Can I use other flavors of cookies?
Yes! Feel free to experiment with different cookie flavors like chocolate chip or peanut butter for unique variations of Oreo Dump Cake.
How do I make this dessert gluten-free?
To make Oreo Dump Cake gluten-free, choose gluten-free chocolate cake mix and ensure that the Oreos you use are also gluten-free.
Can I add other toppings?
Absolutely! You can top your Oreo Dump Cake with crushed nuts, sprinkles, or even fresh fruit before serving for added flavor and texture.
Final Thoughts
Oreo Dump Cake is an easy-to-make dessert that delivers rich chocolatey goodness with minimal effort. Its versatility allows for various customization options, so feel free to get creative with toppings or cookie flavors! Give this recipe a try at your next gathering; it’s sure to impress friends and family alike.
Did You Enjoy Making This Recipe? Please rate this recipe with ⭐⭐⭐⭐⭐ or leave a comment.
📖 Recipe Card
Print
Oreo Dump Cake
- Total Time: 0 hours
- Yield: Approximately 12 servings 1x
Description
Indulge in the delightful layers of this easy Oreo Dump Cake, a rich and satisfying dessert that will impress friends and family alike. This chocolatey treat combines crunchy Oreos, creamy Cool Whip, and a decadent chocolate cake mix for a dessert that is as simple to prepare as it is delicious. With just five key ingredients, you can whip up this gooey masterpiece in no time—perfect for potlucks, gatherings, or a cozy night in. Serve warm with ice cream, drizzled chocolate sauce, or fresh fruit for an elevated experience that everyone will love.
Ingredients
- 20 Oreo cookies
- 14 oz sweetened condensed milk (1 can)
- 1 (8 oz) container Cool Whip, thawed
- 1 box chocolate cake mix
- ¾ cup unsalted butter, cut into small pats
Instructions
- Preheat the oven to 350°F (175°C) and lightly grease a 9×13-inch baking dish.
- Layer 10 Oreo cookies at the bottom of the dish.
- Pour the sweetened condensed milk over the Oreos and spread the Cool Whip on top.
- Evenly sprinkle the chocolate cake mix over the Cool Whip layer and break any lumps with a fork.
- Place pats of butter evenly across the surface of the cake mix without stirring.
- Bake for 40–45 minutes until bubbly and slightly crisp on top. Let it cool for a few minutes before serving.
- Prep Time: 10 minutes
- Cook Time: 40-45 minutes
- Category: Dessert
- Method: Baking
- Cuisine: American
Nutrition
- Serving Size: 1 serving
- Calories: 320
- Sugar: 25g
- Sodium: 210mg
- Fat: 16g
- Saturated Fat: 8g
- Unsaturated Fat: 7g
- Trans Fat: 0g
- Carbohydrates: 42g
- Fiber: 1g
- Protein: 4g
- Cholesterol: 30mg