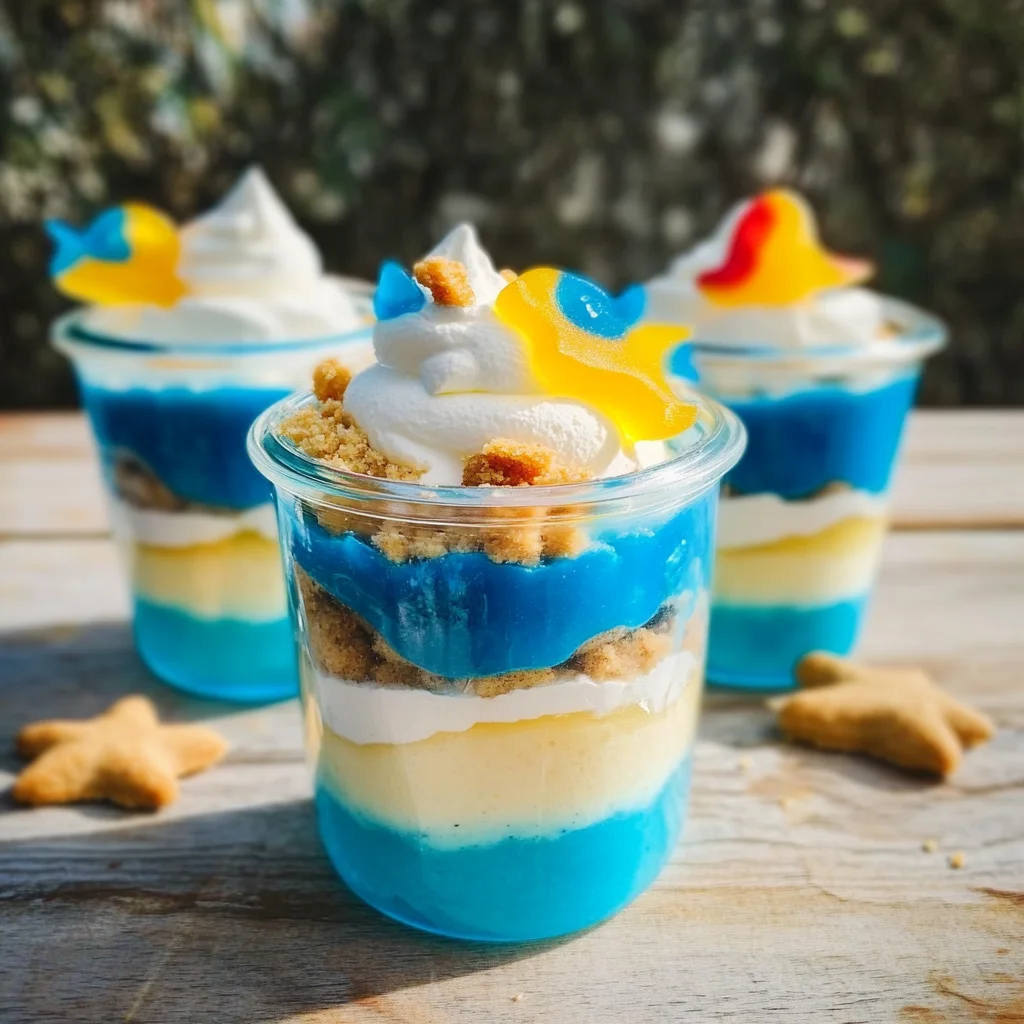
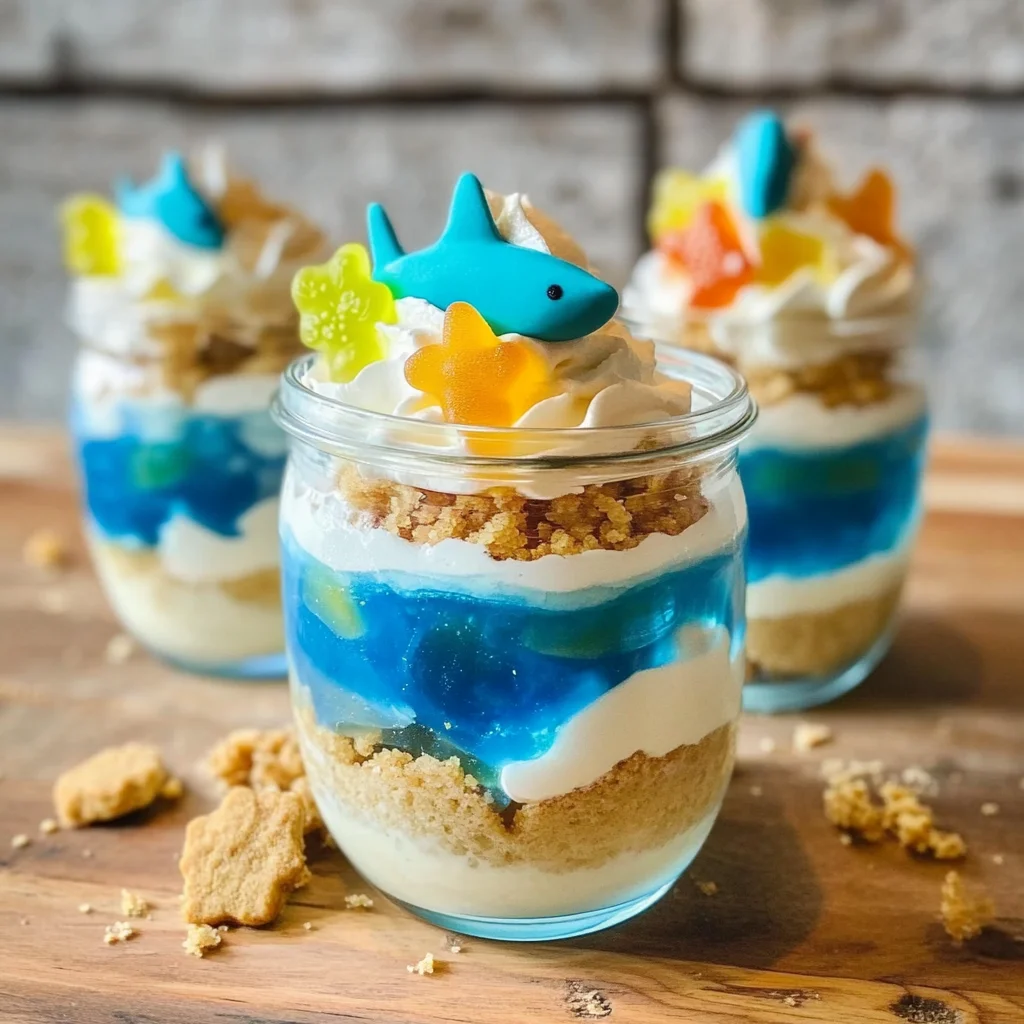
Beach Pudding Jars are a delightful and playful dessert that brings the essence of summer right to your picnic table. This no-bake, make-ahead treat is perfect for family gatherings, beach outings, or any occasion where you want to impress with a fun and delicious dish. With layers of vibrant blue Jell-o, creamy whipped topping, zesty lemon pudding, and crunchy cookie crumbs, these jars create an edible beach scene that kids and adults will both love!
Jump to:
- Why You’ll Love This Recipe
- Tools and Preparation
- Essential Tools and Equipment
- Importance of Each Tool
- Ingredients
- For the Jell-o Layer
- For the Creamy Layers
- For the Crunchy Base and Decorations
- How to Make Beach Pudding Jars
- Step 1: Prepare Your Glass Jars
- Step 2: Make the Blue Jell-o Layer
- Step 3: Add Gummy Sharks
- Step 4: Chill
- Step 5: Whip The Cream
- Step 6: Crush Cookies
- Step 7: Assemble The Beach Pudding Jars
- How to Serve Beach Pudding Jars
- Individual Treats
- Beach-Themed Table Setting
- Pair with Fresh Fruits
- Top with Edible Decorations
- Group Sharing
- How to Perfect Beach Pudding Jars
- Best Side Dishes for Beach Pudding Jars
- Common Mistakes to Avoid
- Storage & Reheating Instructions
- Refrigerator Storage
- Freezing Beach Pudding Jars
- Reheating Beach Pudding Jars
- Frequently Asked Questions
- Can I make Beach Pudding Jars ahead of time?
- What can I substitute for heavy cream?
- How do I customize my Beach Pudding Jars?
- How long do Beach Pudding Jars last?
- Are there any alternatives for gummy sharks?
- Final Thoughts
- 📖 Recipe Card
Why You’ll Love This Recipe
- No Baking Required – Enjoy a delicious dessert without turning on the oven.
- Kid-Friendly Fun – Kids will love helping to assemble their own jars with colorful layers.
- Make Ahead Convenience – Prepare these jars in advance for easy serving at parties or picnics.
- Customizable Toppings – Get creative with different beach-themed decorations to suit your style.
- Refreshing Flavor – The combination of lemon pudding and whipped cream provides a cool treat perfect for warm days.
Tools and Preparation
To create these Beach Pudding Jars, having the right tools will help streamline your process. Gather everything you need before you start assembling.
Essential Tools and Equipment
- 2 (20oz) glass jars or 4 (8oz) glass jars
- Mixing bowls
- Hand mixer
- Food processor or rolling pin
- Measuring cups and spoons
Importance of Each Tool
- Glass Jars – Ideal for showcasing the beautiful layers of your dessert while being easy to transport.
- Hand Mixer – Ensures your whipped cream reaches the perfect consistency without much effort.
- Food Processor – Quickly crushes cookies into fine crumbs for that sandy beach effect without the hassle.
Ingredients
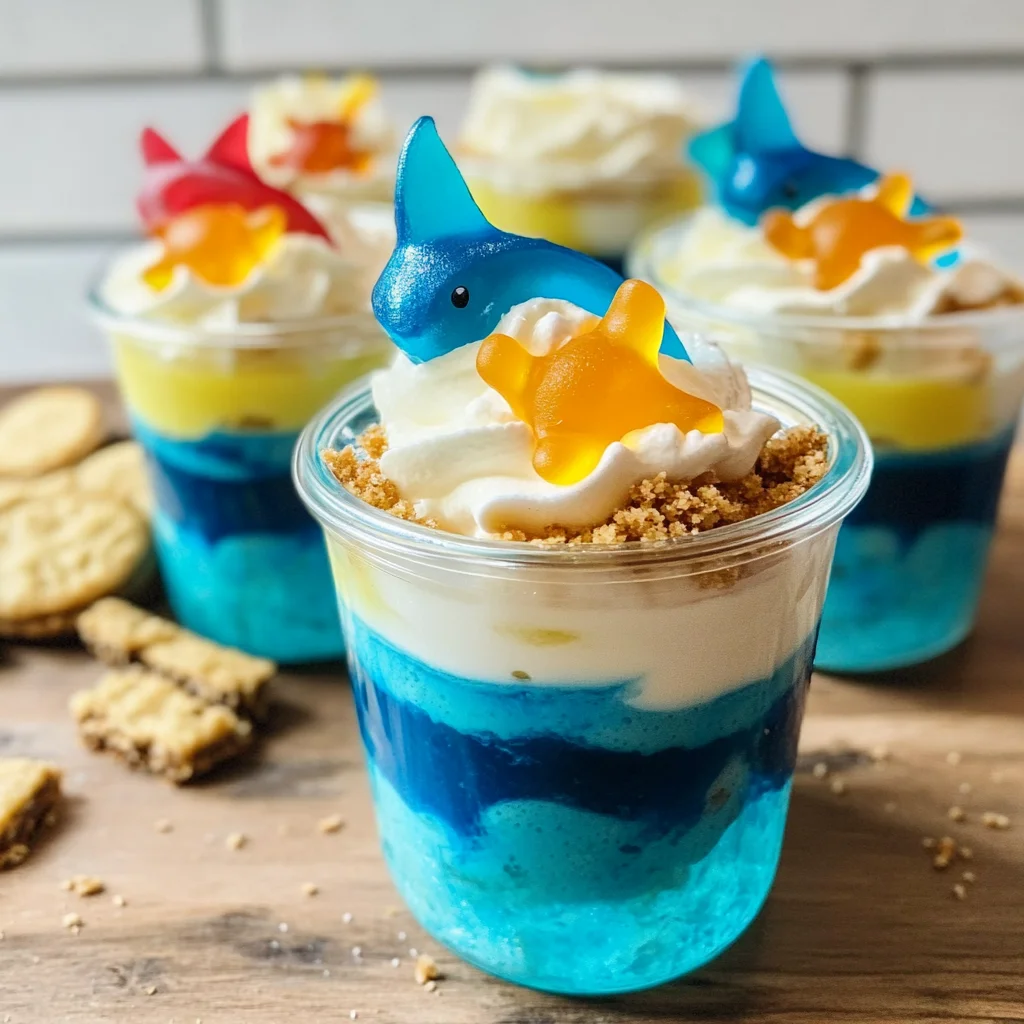
Beach Pudding Jars are the perfect beach picnic dessert! This no bake, make ahead, kid-friendly dessert is creamy, cool and delightfully playful. Layers of blue Jell-o, homemade whipped cream, lemon pudding and cookie crumbs make a fun beach scene that you can eat!
For the Jell-o Layer
- 1 (3oz) box of Blue Jell-o
- 2 c water
- 6-12 gummy sharks
For the Creamy Layers
- 2 c lemon pudding (try my 60 Second Lemon Pudding recipe!)
- 2 c heavy whipping cream
- 1 Tbsp granulated sugar
For the Crunchy Base and Decorations
- 1 ½ c vanilla wafer cookies
- 1-2 Oreo cookie sandwiches (creme removed) or 4 chocolate wafers
- Other edible beach themed décor for the top such as molded chocolate, mini cakes, other candies etc. (optional)
How to Make Beach Pudding Jars
Step 1: Prepare Your Glass Jars
Set aside 2 (20oz) glass jars or 4 (8oz) glass jars with lids for assembly.
Step 2: Make the Blue Jell-o Layer
- Prepare the Blue Jell-o according to package instructions using the 2 cups of water.
- Once mixed, pour the prepared Jell-o equally among all jars.
Step 3: Add Gummy Sharks
When the Jell-o has reached room temperature:
1. Place gummy sharks at the bottom of each jar. Use about 3 sharks for larger jars and 2 for smaller ones.
Step 4: Chill
Chill jars in the refrigerator for at least 3 hours until the top layer of Jell-o is completely set.
Step 5: Whip The Cream
In a large bowl:
1. Combine heavy whipping cream and granulated sugar.
2. Using a hand mixer, beat on high speed until medium-stiff peaks form (about 2-3 minutes). Set aside.
Step 6: Crush Cookies
- Crush vanilla wafer cookies into medium-fine crumbs using either a food processor or by placing them in a plastic bag and crushing with a rolling pin.
Step 7: Assemble The Beach Pudding Jars
Begin layering:
1. Spoon a layer of lemon pudding over the set Jell-o.
2. Follow with a layer of whipped cream.
3. Add cookie crumbs on top to mimic sand.
4. Repeat layers as desired until jars are filled.
Enjoy your Beach Pudding Jars at your next picnic or summer gathering!
How to Serve Beach Pudding Jars
Beach Pudding Jars are versatile and can be enjoyed in various ways. Whether you’re at the beach or hosting a summer gathering, these pudding jars can add a fun touch to your dessert table.
Individual Treats
- Serve each jar individually for easy handling. This makes them perfect for picnics and gatherings.
Beach-Themed Table Setting
- Decorate your table with beach-themed items like seashells and sand buckets. This enhances the overall presentation of the dessert.
Pair with Fresh Fruits
- Add slices of fresh fruit like strawberries or blueberries on the side. The freshness complements the creamy pudding beautifully.
Top with Edible Decorations
- Use edible decorations like gummy sea creatures or chocolate molds to enhance the fun appearance of each jar.
Group Sharing
- Place several jars in a larger bowl filled with ice. This keeps them cool and encourages guests to share different flavors!
How to Perfect Beach Pudding Jars
Creating the perfect Beach Pudding Jars is all about attention to detail and using quality ingredients. Here are some tips to ensure they turn out just right.
- Use Cold Ingredients: Start with chilled heavy cream and pudding mix for better texture and flavor.
- Layer Carefully: Pour layers slowly to create distinct lines between the Jell-o, pudding, and whipped cream for an appealing look.
- Chill Properly: Allow adequate chilling time after assembling. The longer they chill, the better they set.
- Garnish Creatively: Get creative with toppings! Use crushed cookies or decorative candies to mimic sand or beach elements.
- Choose Quality Cookies: Opt for fresh vanilla wafers or chocolate wafers as they hold up well when layered with moist ingredients.
Best Side Dishes for Beach Pudding Jars
To complement Beach Pudding Jars, consider serving these delightful side dishes that enhance your summer spread.
- Fruit Salad: A mix of seasonal fruits adds freshness and balances sweetness from the pudding jars.
- Veggie Platter: Crisp veggies served with hummus make for a healthy side that contrasts nicely with the sweet dessert.
- Tropical Smoothies: Blend mango, pineapple, and coconut milk for refreshing drinks that align perfectly with your beach theme.
- Mini Sandwiches: Prepare small sandwiches using turkey or chicken for a savory option that pairs well with sweet desserts.
- Chips and Salsa: A crunchy snack like tortilla chips served with zesty salsa provides a fun contrast in textures.
- Cheese Platter: Include a selection of cheeses alongside crackers to offer a savory component amidst sweet treats.
Common Mistakes to Avoid
Making Beach Pudding Jars is a delightful experience, but there are common mistakes to watch for.
- Bold Preparation – Not allowing the Jell-o to fully set can lead to layers mixing. Always chill until firm.
- Bold Layering Technique – Forgetting to layer ingredients properly can ruin the beachy aesthetic. Use a spoon to gently layer each component.
- Bold Ingredient Substitutions – Using the wrong types of cookies or gelling agents can affect taste and texture. Stick to vanilla wafers and plant-based gelling agents.
- Bold Wrong Container Size – Using containers that are too small will lead to overflow. Ensure jars have enough capacity for all layers.
- Bold Skipping Chilling Time – Rushing the chilling process can cause the layers to blend together. Be patient and let each layer set properly.
Storage & Reheating Instructions
Refrigerator Storage
- Store in airtight containers for freshness.
- Enjoy within 3-5 days for optimal flavor and texture.
Freezing Beach Pudding Jars
- Freeze in airtight containers if you want to save them longer.
- Best consumed within 1 month for ideal taste.
Reheating Beach Pudding Jars
- Oven – Not recommended, as heating may melt the layers.
- Microwave – Use low power in short intervals if necessary; this is not ideal for pudding jars.
- Stovetop – Avoid direct heating; instead, defrost in the fridge overnight if frozen.
Frequently Asked Questions
Here are some common questions about Beach Pudding Jars.
Can I make Beach Pudding Jars ahead of time?
Yes, you can prepare them a day in advance. Just keep them chilled until serving.
What can I substitute for heavy cream?
You may use coconut cream or whipped coconut milk as a dairy-free option for your Beach Pudding Jars.
How do I customize my Beach Pudding Jars?
Feel free to add different candies or themed decorations like edible sand (crushed cookies) or mini cakes on top!
How long do Beach Pudding Jars last?
They are best consumed within 3-5 days when stored in the refrigerator.
Are there any alternatives for gummy sharks?
You can use any candy that fits the beach theme, such as fish-shaped gummies or chocolate seashells!
Final Thoughts
Beach Pudding Jars are not only fun but also versatile enough for any gathering. You can easily customize them with different flavors or decorations. Try making these delightful jars for your next picnic or party—they’re sure to impress everyone!
Did You Enjoy Making This Recipe? Please rate this recipe with ⭐⭐⭐⭐⭐ or leave a comment.
📖 Recipe Card
Print
Beach Pudding Jars
- Total Time: 30 minutes
- Yield: Serves 4
Description
Experience the joy of summer with our delightful Beach Pudding Jars! This fun, no-bake dessert is perfect for picnics, beach outings, or family gatherings. With vibrant layers of blue Jell-o, zesty lemon pudding, creamy whipped topping, and crunchy cookie crumbs, these jars create a whimsical beach scene that will charm both kids and adults. Easy to prepare ahead of time, they offer a refreshing treat that captures the essence of sunny days. Customize your jars with playful decorations for added flair. Dive into this deliciously layered dessert and bring a taste of the ocean to your table!
Ingredients
- 1 (3oz) box of Blue Jell-o
- 2 cups water
- 2 cups lemon pudding
- 2 cups heavy whipping cream
- 1 tablespoon granulated sugar
- 1½ cups vanilla wafer cookies
- Optional: Gummy sharks or other edible decorations
Instructions
- Prepare Blue Jell-o according to package instructions using 2 cups of water. Pour evenly into jars and chill until set (about 3 hours).
- Place gummy sharks in each jar once the Jell-o has set.
- Beat heavy whipping cream with sugar until medium-stiff peaks form.
- Crush vanilla wafer cookies into fine crumbs.
- Layer lemon pudding over the Jell-o, followed by whipped cream and cookie crumbs. Repeat layers as desired.
- Prep Time: 30 minutes
- Cook Time: 0 minutes
- Category: Dessert
- Method: No-Bake
- Cuisine: American
Nutrition
- Serving Size: 1 jar (200g)
- Calories: 330
- Sugar: 23g
- Sodium: 120mg
- Fat: 18g
- Saturated Fat: 11g
- Unsaturated Fat: 6g
- Trans Fat: 0g
- Carbohydrates: 42g
- Fiber: 1g
- Protein: 5g
- Cholesterol: 75mg